

You scale a plate down to a quarter and back up again: in Nuke the result is the original, pixel for pixel. Put a Grade between the two Transforms, a Grade that does nothing, and the same plate comes back with 44% of its fine detail. That's concatenation: Nuke's habit of joining transforms into one before it touches the pixels, and what happens when something stops it. This page explains how it works, which nodes join and which break the chain (I measured 40 of them in Nuke 17.0v1), what the filter and the motion blur have to do with it, and how to build comps that filter the plate only once. The idea isn't mine: it comes from Ivan Busquets' article on Nukepedia, which I've read many times. Here I tested its rules again in Nuke 17, added the numbers, and wrote a checker you can paste your own nodes into.
Index
- 01. The plate that went soft
- 02. What concatenation is
- 03. Lab: how the softness adds up
- 04. Which nodes concatenate: 45 nodes measured
- 05. Same colour doesn't mean it concatenates
- 06. The last node chooses the filter
- 07. Motion blur
- 08. Nodes that only concatenate upstream
- 09. One STMap instead of many filters
- 10. From 2D into 3D
- 11. And colour nodes?
- 12. Chain checker: paste your nodes
- 13. How to build a comp that filters once
- 14. Nodes to paste in Nuke
- 15. Videos
- 16. Read more
01. The plate that went soft
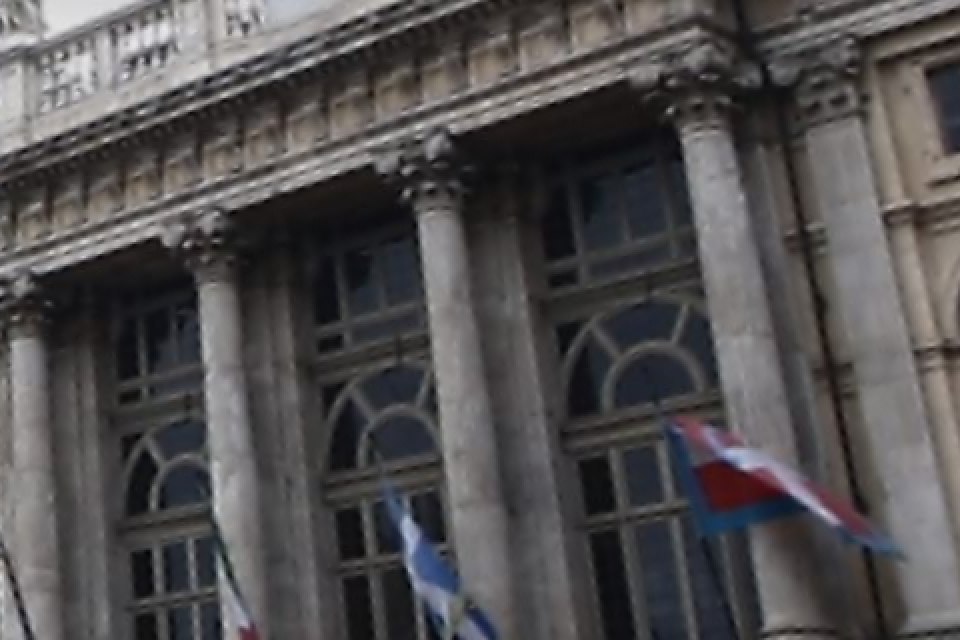
Two Transforms: the first scales the plate to 0.25, the second scales it by 4. On the left they sit one under the other. On the right there's a Grade between them with its default values: it changes nothing in the colour. Move the line on the image.
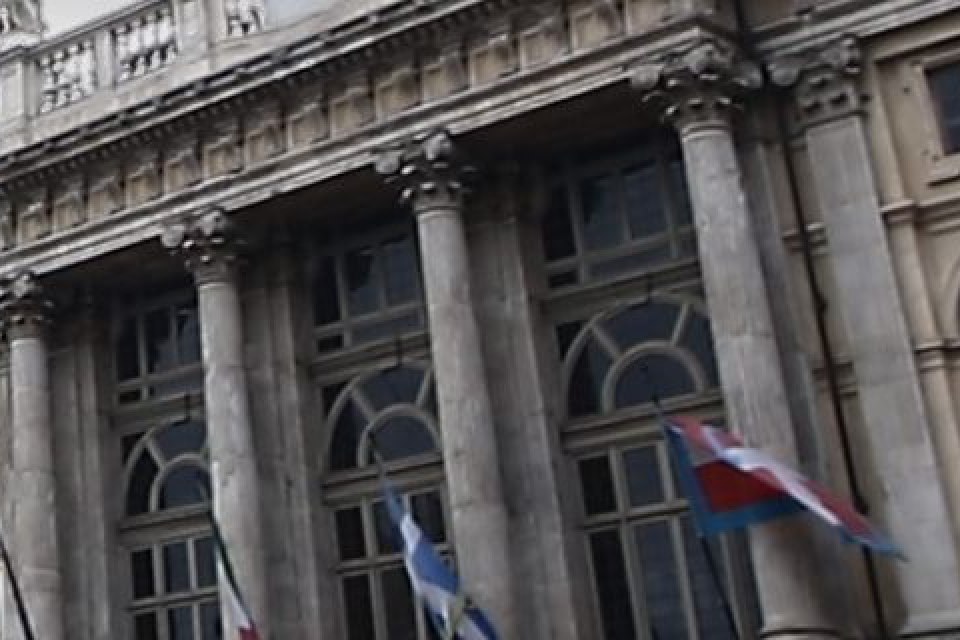

A crop of the plate of Whale, enlarged 2× with no filtering so you see the real pixels. Rendered in Nuke 17.0v1, Cubic filter on both Transforms.
Nothing is wrong with the Grade. The problem is where it is. Without it, Nuke multiplies the two scales (0.25 × 4 = 1) and does nothing at all. With it, the first Transform has to really make a quarter-size image, so 15 of every 16 pixels are gone, and the second Transform can only stretch what's left.
02. What concatenation is
A Transform doesn't move pixels until it has to. When it renders, it first asks its input: are you a transform too? If the answer is yes, it takes that transform's matrix, multiplies it with its own and asks the next one up. The chain goes on until a node answers no. Only then is the image resampled, once, with the total matrix. Every resample is a filter, and every filter softens a little: concatenation is how Nuke keeps that to one.
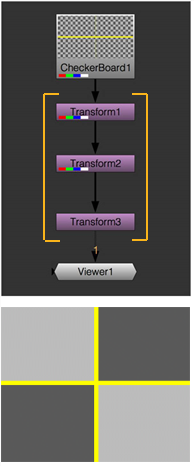
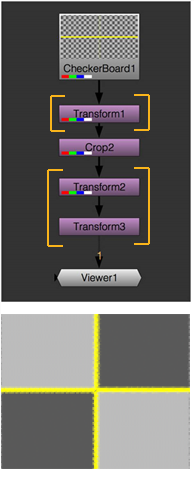
- The maths: every 2D transform is a 3×3 matrix, and two transforms in a row are the product of their matrices. The Transform matrix page shows it step by step; the CornerPin and homography page does the same for a CornerPin.
- The filter: resampling means reading the image between pixels and building new pixels from the old ones. Which kernel does it, and what each one costs, is on Filtering and resampling: section 07 there is the short version of this page.
- There's no indicator. Nuke draws nothing in the Node Graph to tell you that two nodes concatenate. You find out from the result, or from knowing the rules below.
- It also saves time: one resample of a 4K plate instead of ten.
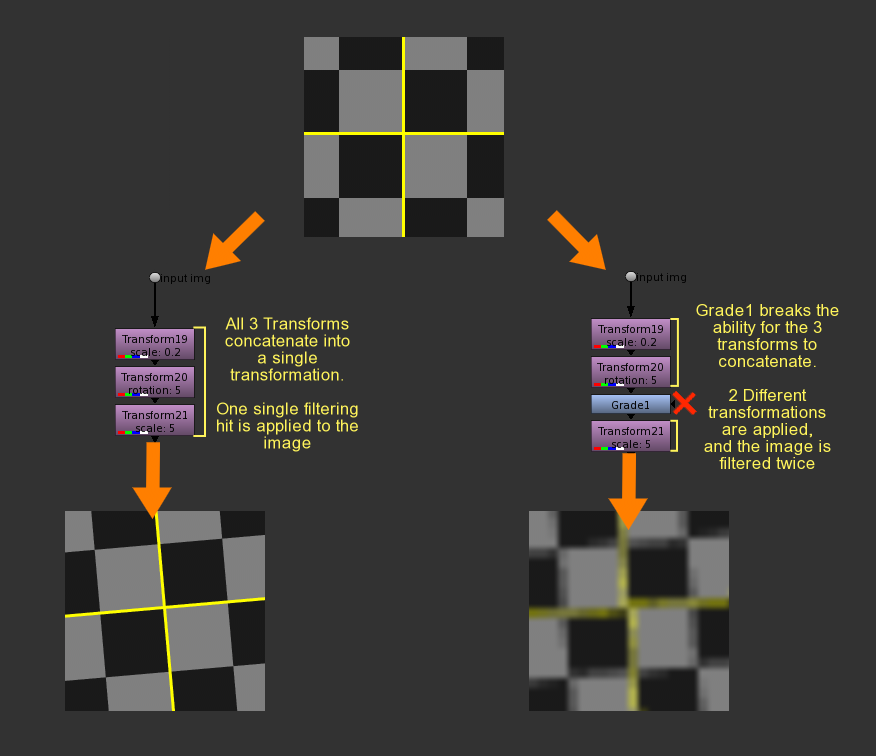
03. Lab: how the softness adds up
One break is a small loss; the trouble is that in a real comp they pile up: a Grade here, a Crop there, a TimeOffset for a slip. In this lab I rotated the plate by 7° and back by −7° again and again, with a Grade after every Transform. Each step is a net zero: a concatenated chain would give back the original. Choose how many back-and-forth steps and which filter.
Rotate +7°, Grade, rotate −7°, Grade, and again
Nuke 17.0v1. A crop of the plate, enlarged 2× without filtering. "Detail kept" is the mean difference between neighbouring pixels, against the original.
- Cubic, the default filter, loses 12% of the detail at the first step and 38% after eight. The first steps hurt the most.
- Lanczos4 keeps more (87% after eight steps) because it sharpens while it resamples. It doesn't give back what's lost, it hides it: the sharpening adds a little ringing on hard edges.
- Impulse doesn't soften at all, it does something worse: it snaps every pixel to the nearest one, so lines step and jitter. The "detail" goes up (106%) because those steps are new, false edges.
- Concatenated, the same eight back-and-forth steps with a Dot and a FrameHold between the Transforms: 100%, the original. Dot and FrameHold don't break the chain.
04. Which nodes concatenate: 45 nodes measured
The test: a Transform rotating the plate by 7°, the node to test, a Transform rotating it back. If the node lets the two Transforms join, the result is the original (error 0). If it breaks the chain, the plate is filtered twice (error about 0.0023 with Cubic). Every node at its default values, unless the table says otherwise.
They concatenate
Transform, TransformMasked (upstream only, see 08), CornerPin2D, Card3D, Reformat, Mirror2 (also with a real flop), Stabilize2D, Tracker4 (in transform mode), Retime (default), FrameHold, TimeWarp.
Transparent: they don't break it
Dot, NoOp, Switch, any disabled node, AddChannels, Remove (keeping rgba), PostageStamp.
They break it
Colour: Grade (even at default values), ColorCorrect, Multiply (even by 1), Clamp, Expression, OCIOColorSpace, Premult, Unpremult. Channels: Shuffle2, Copy, ChannelMerge, Merge2 (even with only the B input). Filters: Blur (even with size 0). Transform-looking nodes: Crop (even full frame), Position, Tile, IDistort, STMap, GridWarp3, SplineWarp3, LensDistortion2. Time: TimeOffset (even at 0), FrameRange.
- The surprises: Crop, Position and IDistort sit in the Transform menu and still break the chain. TimeOffset and FrameRange break it even at their defaults, while FrameHold, Retime and TimeWarp don't. A Grade at its default values breaks it: Nuke doesn't check whether a node actually changes the image.
- Remove at its default removes channels, and the error jumps to 0.73: not a concatenation problem, the image is gone. Set it to keep rgba and it's transparent.
- PostageStamp: an old Foundry bug report says it breaks concatenation. In Nuke 17.0v1 I measured error 0: it doesn't any more.
- Disabled nodes are skipped completely. A quick test in your own comp: disable the suspect node and look at the plate. If it gets sharper, that node was breaking the chain.
Ivan Busquets gives a good rule for any node not in my list: look at its knobs.
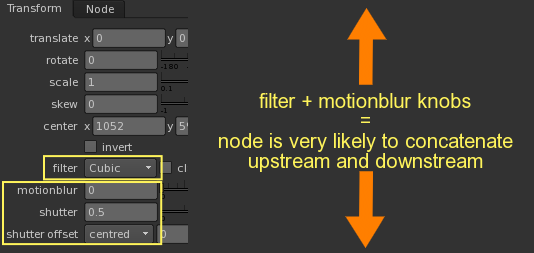
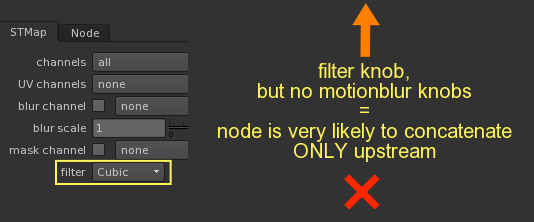
The exceptions he points out match what I measured: Reformat has no motion blur knobs (nothing to animate) and concatenates both ways; TransformMasked has motion blur knobs and still concatenates only upstream.
05. Same colour doesn't mean it concatenates
It's easy to learn the rule by colour: violet nodes concatenate, the rest doesn't. The colour of a tile comes from the menu the node lives in, not from what it does to the pixels. I read the default colours in Nuke 17 with nuke.defaultNodeColor() and put them next to my measurements:
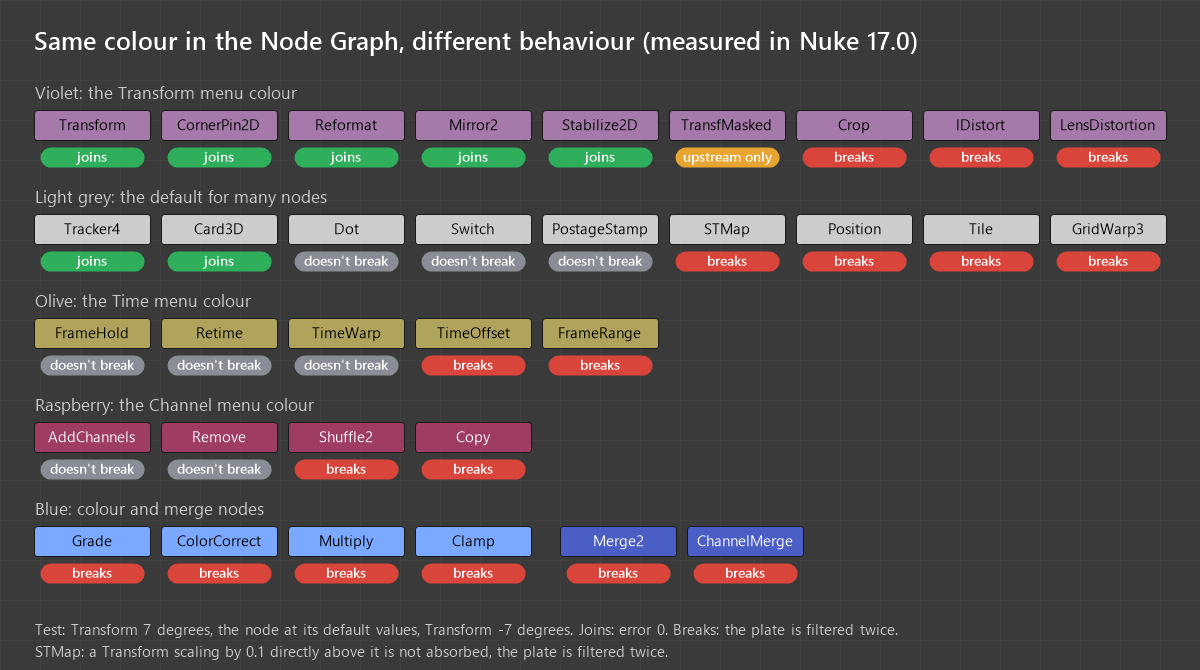
- Violet (#a57aaa) is the Transform menu. Crop, IDistort and LensDistortion have the same violet as a Transform and break the chain. TransformMasked is violet too and ends it (section 08).
- Light grey (#cccccc) is the colour of nodes that have none of their own, so it tells you nothing: Tracker4 and Card3D concatenate, Dot, Switch and PostageStamp are transparent, STMap, Position, Tile and GridWarp3 break.
- Olive (#b0a45d) is the Time menu. FrameHold, Retime and TimeWarp let the chain through; TimeOffset and FrameRange, same colour and same menu, break it even at their defaults.
- Raspberry (#9e3c63) is the Channel menu: AddChannels and Remove (keeping rgba) are transparent, Shuffle2 and Copy break.
- Blue is the one colour where the rule holds: none of the light blue colour nodes (#7aa9ff) and none of the dark blue merge nodes (#4b5ec6) concatenate.
- Your colours may not be mine. Many studios recolour nodes in their menu.py, and anyone can change a tile colour by hand: in a script from someone else, the colour tells you even less.
What to look at instead: the knobs (a filter knob, section 04), the checker (section 12), or the quickest test, disabling the node and looking at the plate. To see the default colours in your own Nuke, in the Script Editor:
Prints the default tile colour of a few nodes (tested in Nuke 17.0v1).
import nuke
for c in ['Transform', 'Crop', 'IDistort', 'LensDistortion2', 'STMap', 'FrameHold', 'TimeOffset']:
    print(c.ljust(16), '#%06x' % (nuke.defaultNodeColor(c) >> 8))
06. The last node chooses the filter
When nodes concatenate, there's only one resample, so there's only one filter: the one of the last node of the chain. The filter knobs of the nodes above are ignored. I checked it: Impulse then Cubic gives exactly the result of a single Cubic, Cubic then Impulse the result of Impulse, Cubic then Lanczos4 the result of Lanczos4.
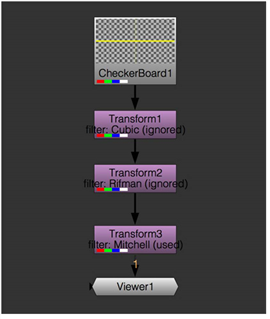
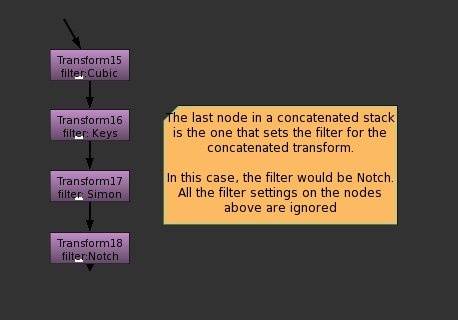
And when the chain breaks, every piece uses its own last filter. How much each filter costs at one break (rotate 7°, Grade, rotate −7°), and what it does at a net identity when nothing breaks:
| filter | error with one break | concatenated, net zero move | use it for |
|---|---|---|---|
| Impulse | 0.00057 | 0, the original | Moves by whole pixels, grain and noise you don't want to soften |
| Cubic (default) | 0.00262 | 0 | Everyday transforms |
| Keys | 0.00119 | 0 | A little sharper than Cubic |
| Simon | 0.00110 | 0 | Sharper, may ring on bright edges |
| Rifman | 0.00187 | 0 | Strong sharpening |
| Mitchell | 0.00259 | 0.00102: it softens anyway | Scaling down, hides pixelation |
| Parzen | 0.00519 | 0.00301: it softens anyway | Heavy smoothing |
| Notch | 0.00684 | 0.00442: it softens anyway | Fighting moiré and buzzing edges |
| Lanczos4 | 0.00117 | 0 | Scaling, sharp and clean |
| Lanczos6 | 0.00079 | 0 | Scaling, the sharpest of the clean ones |
| Sinc4 | 0.00614 | 0 | Maximum sharpness, with ringing |
- Mitchell, Parzen and Notch are not interpolating: they blur even when the total move is zero. If one of them is the last node of your stack, the whole plate gets softened even though nothing moved.
- So set the filter on the last node of the stack, and when you add a Transform at the bottom, remember that its filter now decides for all of them.
07. Motion blur
Motion blur follows the same idea: the last node decides. With motion blur on, the filter knob of that node is ignored too, because the blur uses its own sampling. And motion blur can break the chain by itself. I tested two Transforms with static values:
| first Transform | second Transform | result |
|---|---|---|
| motion blur off | motion blur off | concatenated |
| motion blur off | motion blur on | concatenated |
| motion blur on | motion blur on | concatenated |
| motion blur on | motion blur off | broken (error 0.00328) |
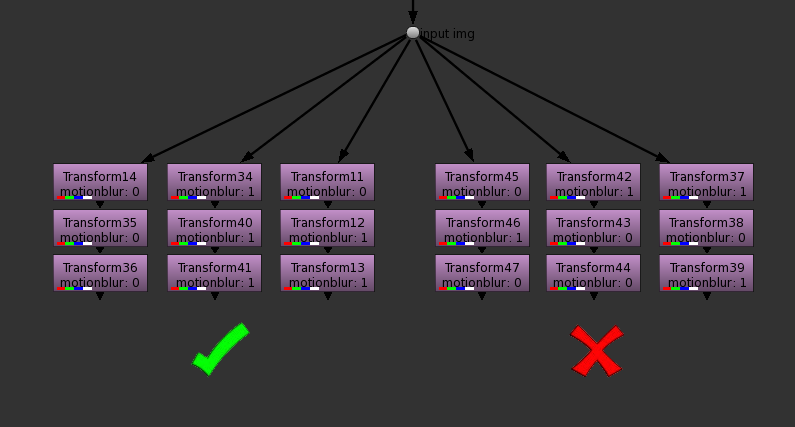
- The rule: turn motion blur on in the last node of the stack. The nodes above can have it off: the last one computes the blur for the whole concatenated move.
- Tracker-driven stacks often have motion blur on in the middle (on a Tracker or a CornerPin) and off at the bottom. That's the one combination that breaks the chain.
08. Nodes that only concatenate upstream
Some nodes can take the transforms above them into their own resample, but can't pass themselves on to the nodes below. They end the chain. I measured it on TransformMasked: a Transform followed by a TransformMasked of −7° gives error 0; a TransformMasked followed by a Transform gives 0.0026. According to Ivan Busquets' article, STMap, GridWarp and ScanlineRender do the same. For the STMap, Nuke 17.0 doesn't agree: a Transform scaling the plate to 0.1 directly above an STMap that scales it back by 10 gives exactly the result of a broken chain (error 0.0201, the same as with a Grade between two Transforms), not the original (0 with two Transforms). In 17.0 the STMap filters on its own.
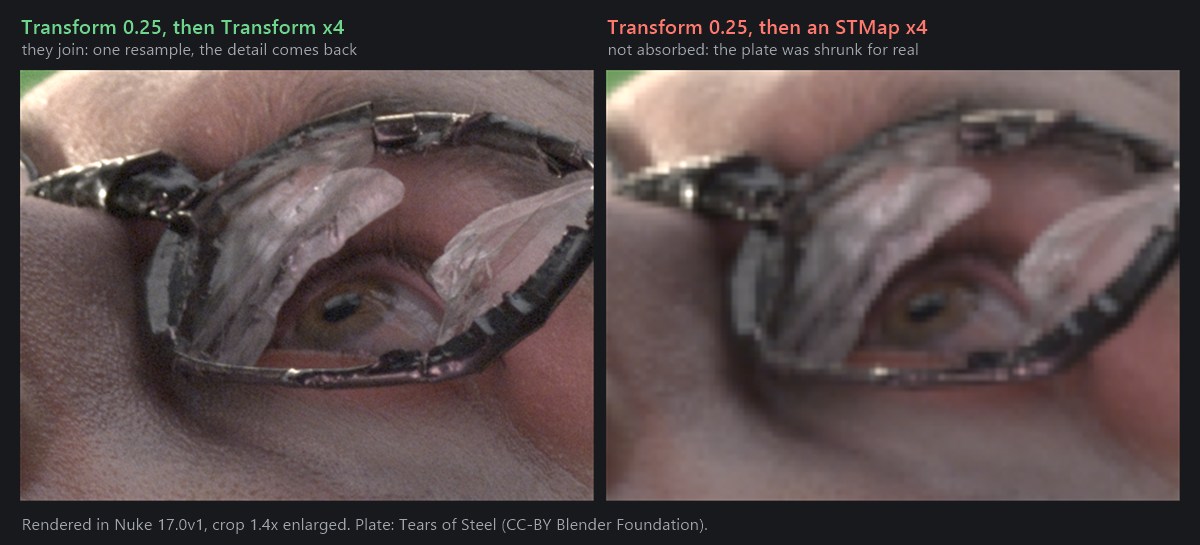
- Put them at the end of a transform stack. A Transform after a TransformMasked or an STMap filters the image again.
- Don't count on an STMap to absorb the stabilise above it: in my test it didn't. If the plate needs an undistort and a move, bake both into one map: next section. The STMap page has the undistort and redistort setup.
- In the middle of a chain, GridWarp3, SplineWarp3 and LensDistortion2 broke it in my tests, as an upstream-only node should.
09. One STMap instead of many filters
A tracked shot often ends up with a chain like this: a LensDistortion to undistort, a Transform from the tracker to stabilise, a Crop to clean the edges, the same Transform inverted to put the move back, and a LensDistortion to redistort. LensDistortion doesn't join the chain and the Crop breaks it, so the plate is filtered four times, even when the total move is zero.
The way out: move a map instead of the plate. An STMap is a picture of where every pixel comes from. Start with the map that changes nothing, x and y written into red and green, and send it through the same nodes instead of the plate. Every move is now baked into the map, and a single STMap reads the plate once, with one filter.
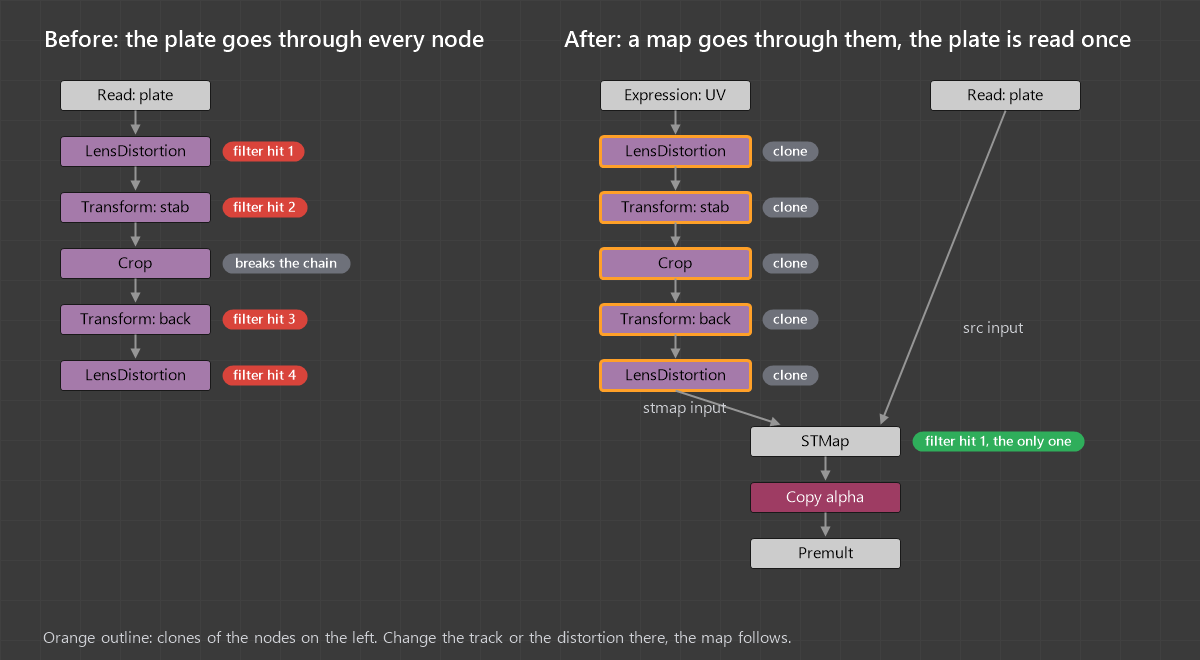
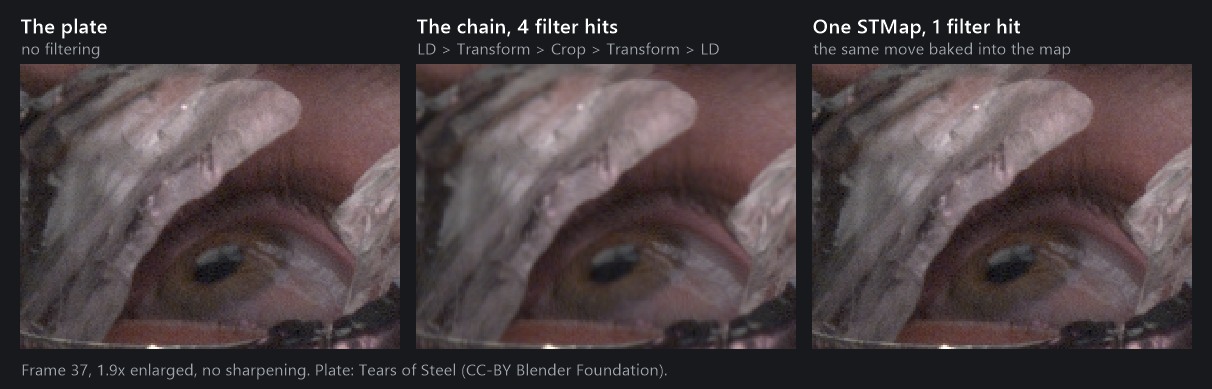
Why the map survives four resamples: its values are a smooth ramp, and resampling a ramp gives back the same ramp. The plate has grain and edges and loses some of them at every pass; the ramp has nothing to lose. I measured it on a Tears of Steel plate (4096 × 2160), with an animated stabilise (translate and rotate) and a lens distortion of k 0.03:
| setup, moves that cancel out | filter hits | error against the plate | detail kept |
|---|---|---|---|
| LD, Transform, Crop, Transform, LD | 4 | 0.0084 to 0.0089 | 42% |
| The same without the Crop | 2: the Transforms join and cancel out | 0.0059 | 59% |
| One STMap with the move baked in | 1 | 0.0001 | 99% |
Detail kept: the average difference between neighbouring pixels, against the plate. With a real reframe at the end (a scale of 1.15 before the redistort), the chain keeps 37 to 45% and the STMap 64 to 73%, depending on the frame: the upscale softens both, but only the chain adds its own losses.
Download the setup: one degradation instead of many
My script degradation_of_plate.nk builds the same move twice, side by side. On the left a CheckerBoard, standing in for the plate, goes through a Mirror, a GridWarp, a CornerPin, a Transform, a Card rendered through a camera and an IDistort driven by Noise. Every node that breaks the chain filters it again. On the right the same nodes move a UV map (the UV_Map group at the top: an Expression with (x+0.5)/width and (y+0.5)/height, plus an overscan option), and a single STMap at the bottom reads the checkerboard once.
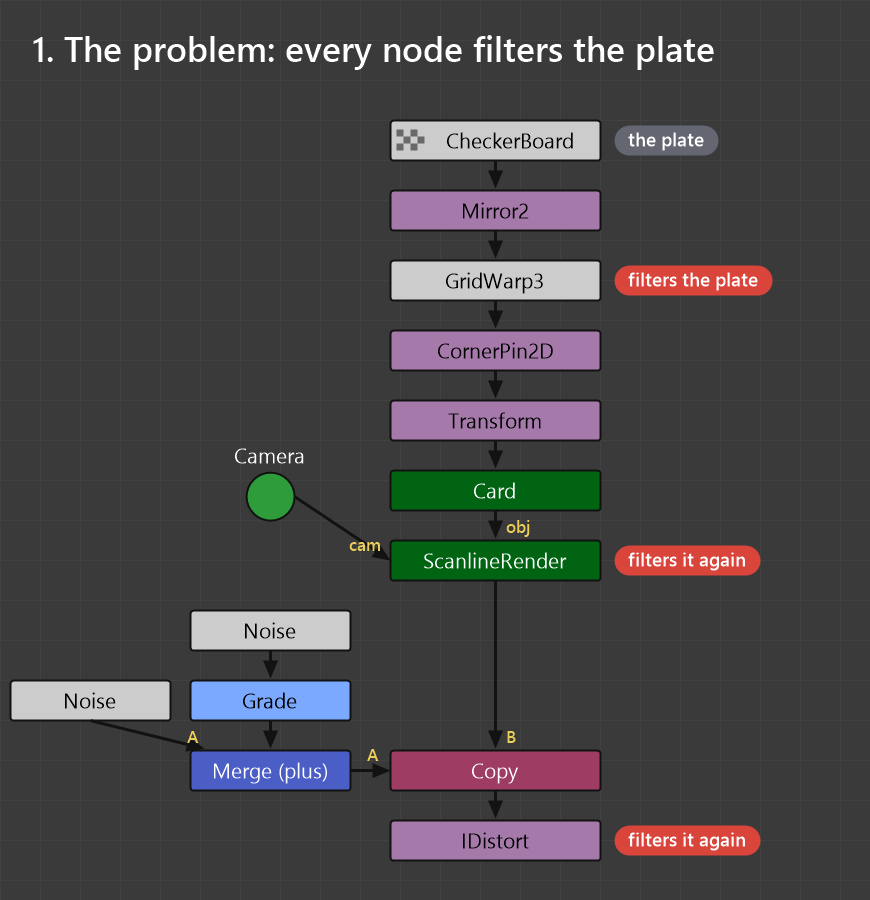
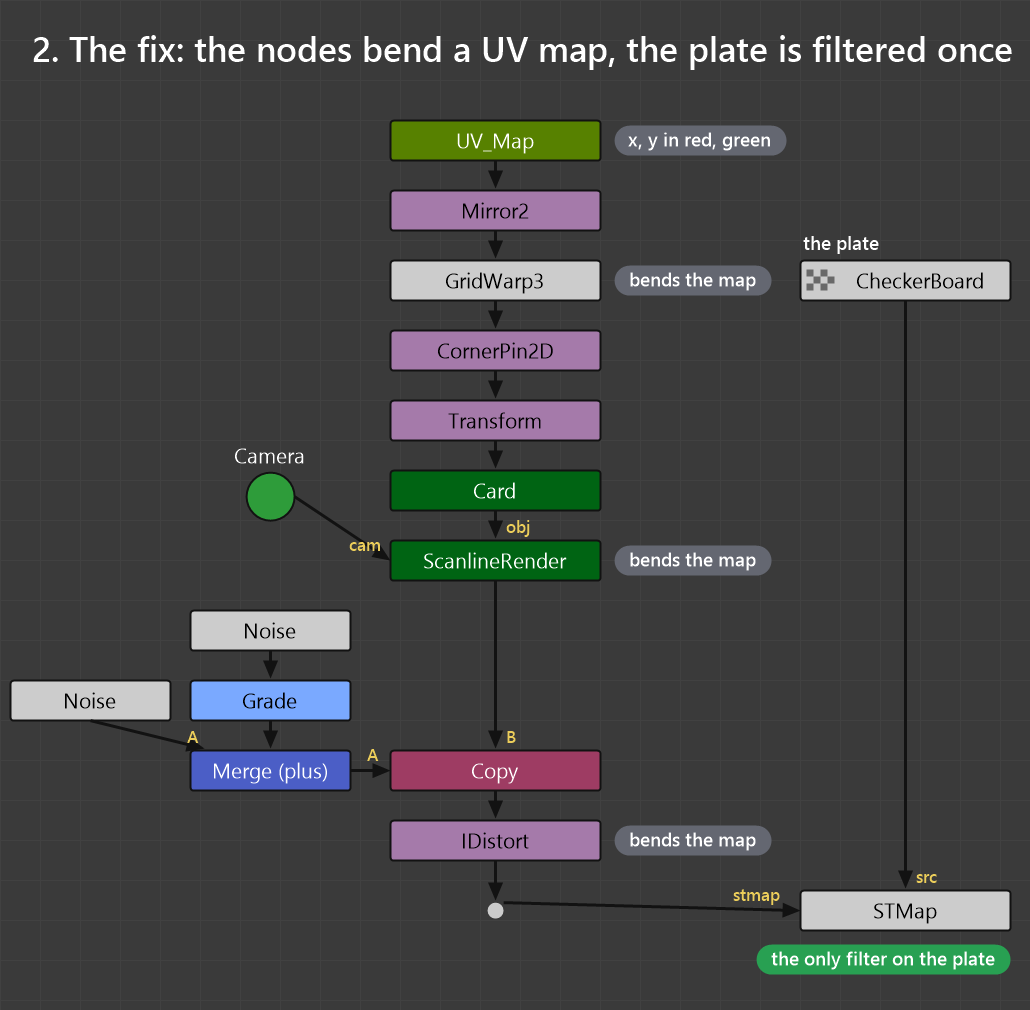
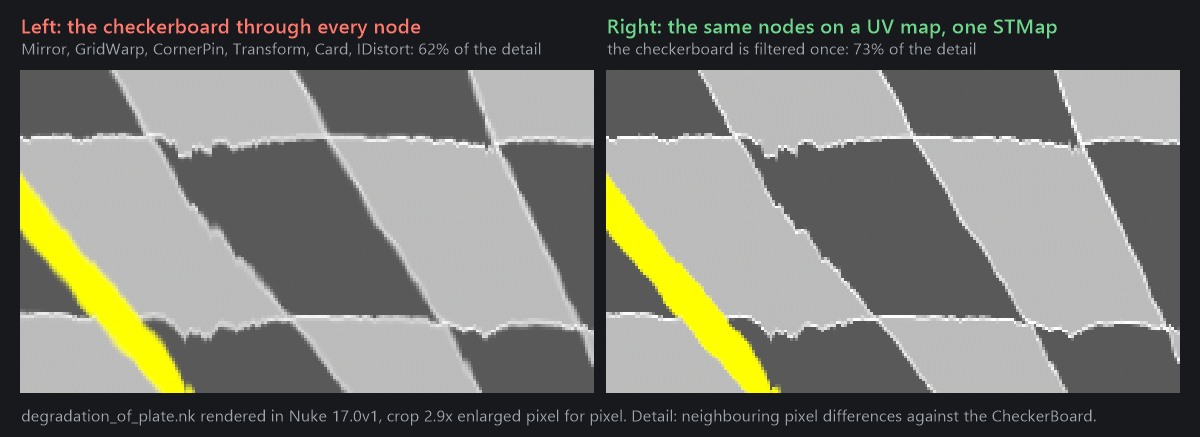
- Measured on the whole frame: the left keeps 62% of the detail of the CheckerBoard, the right 73%. The rest is the stretch of the warp itself, which no setup can avoid.
- The corners: where the warp leaves the frame empty, the map is 0 and the STMap repeats the bottom-left pixel of the checkerboard (the white you see outside). Turn on alpha 1 in the UV_Map group, copy the alpha of the warped map onto the STMap result and premultiply.
- Use it with your plate: replace the CheckerBoard on the right with your Read and put your own nodes between the UV_Map and the STMap.
Download degradation_of_plate.nk (Nuke 17, 17 KB)
- Only the geometry goes into the map. A paint, a roto or a grade on the stabilised plate can't be baked. Use the map for the plate where it only has to move, and for the elements that follow the track: a CG render, a patch or a matte painting going back through the matchmove and the redistort.
- 32-bit float. If you write the map to disk, write it as a 32-bit EXR. In half float the positions lose precision: at UHD I measured errors close to one pixel.
- The edges. Outside the image the map is 0, and an STMap reads 0,0 as the bottom left pixel and smears it over the border. Put 1 in the alpha of the starting map and copy it onto the result, as the script below does.
- Motion blur. The STMap has none. For a stabilise that goes back to where it was, there is no blur to add. If the element really moves and needs motion blur, keep a normal chain with the motion blur on its last Transform (section 07).
- The filter of the STMap is the only one the plate sees. Mitchell, Parzen and Notch soften even when nothing moves (section 06).
Select the nodes of the move (LensDistortion, Transforms, Crop: one branch, nothing else) and run this in the Script Editor. It clones them under a starting map, so the map follows every change to the track or the distortion, and reads the plate once with an STMap. Tested in Nuke 17.0v1: on the chain above the error drops from about 0.008 to 0.0001, and after changing the originals the map still matched them.
import nuke
sel = nuke.selectedNodes()                       # the move only: LensDistortion, Transforms, Crop... one branch
bottom = [n for n in sel if not any(m.input(0) is n for m in sel)][0]
chain = [bottom]
while chain[-1].input(0) in sel:
    chain.append(chain[-1].input(0))
chain.reverse()                                  # top to bottom
plate = chain[0].input(0)
for n in nuke.allNodes():
    n.setSelected(False)                         # nothing selected: new nodes don't get wired into the chain
uv = nuke.nodes.Expression(inputs=[plate], label='identity UV')
uv['expr0'].setValue('(x+0.5)/width')
uv['expr1'].setValue('(y+0.5)/height')
uv['expr2'].setValue('0')
uv['expr3'].setValue('1')
last = uv
for n in chain:                                  # clones follow every change you make to the originals
    cl = nuke.clone(n, inpanel=False)
    cl.setInput(0, last)
    last = cl
st = nuke.nodes.STMap(inputs=[plate, last], uv='rgb')
cp = nuke.nodes.Copy(inputs=[st, last], from0='rgba.alpha', to0='rgba.alpha')
nuke.nodes.Premult(inputs=[cp], label='one filter: compare with ' + bottom.name())
The same idea has another use. Kenn Hedin Kalvik's Warp Transform sends a coordinate map through any transform (a Transform, a CornerPin, a GridWarp), subtracts the starting coordinates and feeds the difference to an IDistort. Masked with a soft roto, the edge of the mask fades how much the move applies, instead of fading between the moved and the unmoved image as a TransformMasked does; and the UV scale of the IDistort turns the whole warp up or down with one knob.
10. From 2D into 3D
Concatenation doesn't stop at the edge of the 3D system. Geometry samples its texture with the 2D transforms directly above it, so a plate scaled down in 2D and then seen up close through a camera is filtered once, at the render. Ivan Busquets credits the discovery to Frank Rueter. His diagrams show that it holds through a shader, through a MergeMat with two inputs, and even through a Project3D:
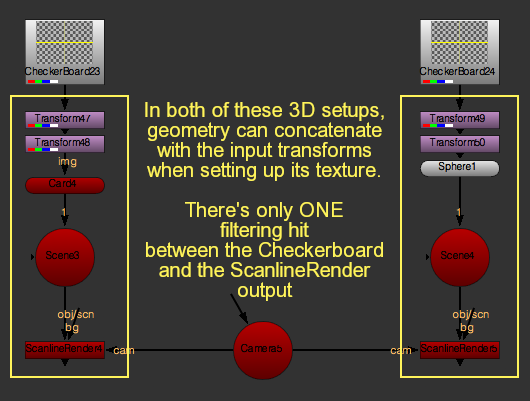
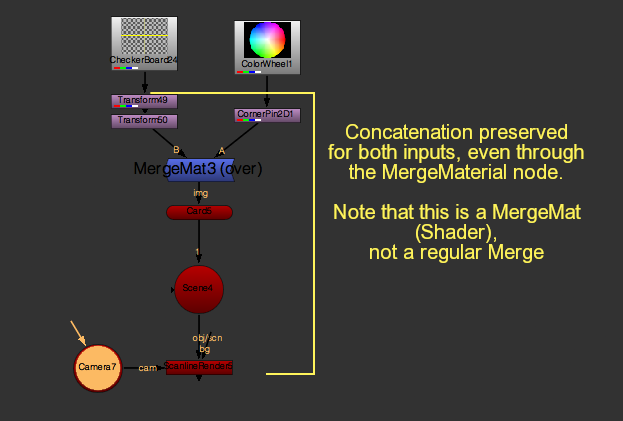
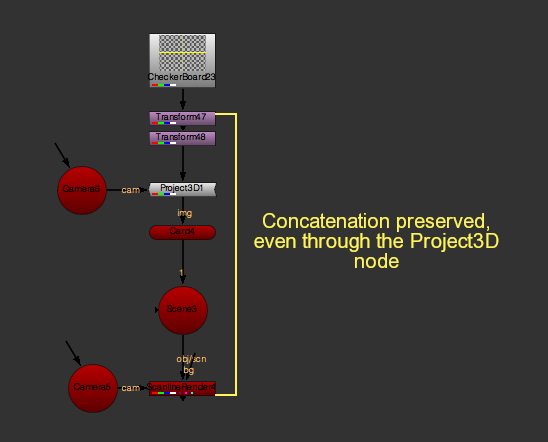
- In my 2D test, Card3D concatenated like a Transform (error 0).
- Nuke 17 also has the new USD-based 3D system: these diagrams are from the classic one. I haven't measured the new one yet.
11. And colour nodes?
Colour nodes don't concatenate, and they don't need to. Nuke works in 32-bit float: a Grade multiplying by 4 followed by a Grade multiplying by 0.25 gives back the image exactly, error 0, I measured it. There is no rounding to accumulate, as there would be in 8 or 16 bits.
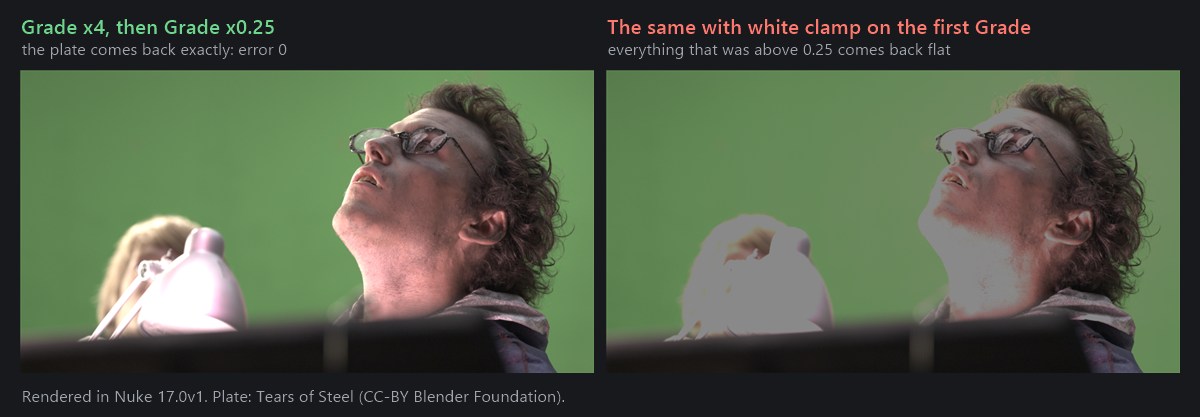
- The exception is clamping. The same two Grades with "white clamp" ticked on the first one: error 0.49. Everything above 1.0 is cut away by the first and can't come back. Clamp, a Grade with clamps, some keyers and a Write to an 8-bit file all throw values away.
- So the order of colour nodes is a matter of what you want, not of quality. The order of transforms, and what you put between them, is a matter of quality.
12. Chain checker: paste your nodes
Select a branch of your comp in Nuke, copy it (Ctrl+C), and paste it here. The checker reads the nodes from top to bottom and tells you how many times the image is filtered, which node breaks the chain, which filter each piece uses, and what to move. It works with the rules and measurements above. No Nuke needed, and nothing leaves your browser. You can also start from an example or build a chain with the buttons.
How many times is your plate filtered?
It reads a single branch from the top down. With Merges or several inputs it follows the order of the nodes in the paste and tells you so.
13. How to build a comp that filters once
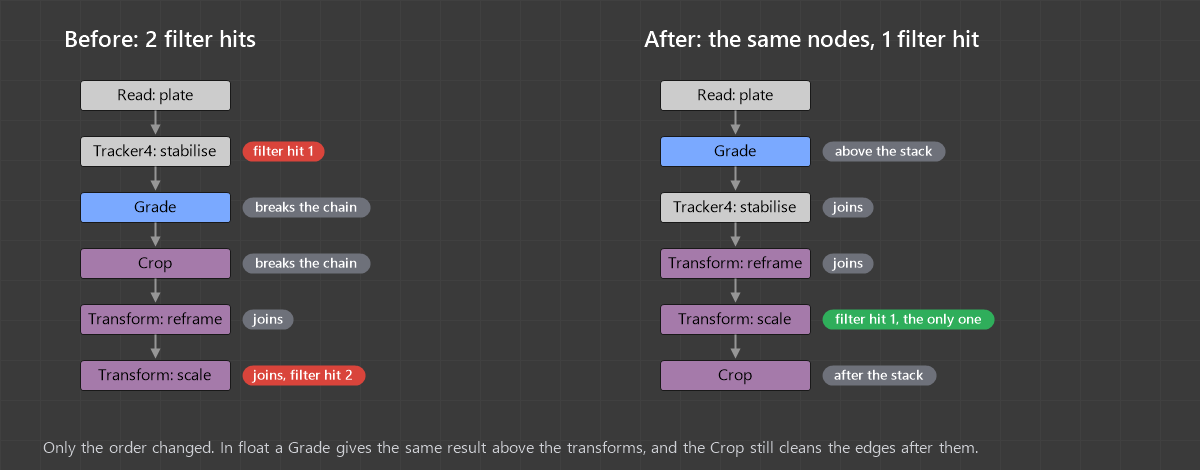
- Keep transforms together. Stabilise, reposition, scale, CornerPin: one block, nothing in between. Colour corrections go above the block or below it, never inside.
- Crop after the transforms, not between them. If you need a Crop to limit the bounding box early, put it above the first Transform.
- Time nodes: a TimeOffset in the middle of a stack breaks it, even at 0. Put it above the stack, or use a FrameHold or a Retime, which in my tests don't break it.
- Track, stabilise, matchmove: the classic chain Transform (stabilise), paint or roto, Transform (matchmove back) filters twice by design, because the paint has to happen on the stable plate. Use a good filter on both, and do the paint on a copy that you merge back only where it's needed, so the rest of the plate never goes through the two Transforms.
- Set the filter and the motion blur on the last node of every stack.
- Upstream-only nodes at the end: TransformMasked, GridWarp, ScanlineRender. The STMap ends the chain too, and in 17.0 doesn't take in the Transform above it.
- Many moves on a tracked plate? Undistort, stabilise, move back, redistort: bake them into one STMap and the plate is filtered once (section 09).
- Don't trust the colour. A violet node can break the chain and a grey one can concatenate (section 05).
- ID passes are never filtered. A Cryptomatte or an object ID stores numbers, not colours: averaging two IDs gives a third one that belongs to nothing. Kenn Hedin Kalvik moves and reformats them on their own branch with the filter set to Impulse.
- Disable to test. Disable a suspect node: if the plate gets sharper, it was breaking the chain. A Dot, a NoOp and a Switch are always safe.
- Scaling down and up again (for a proxy, a blur trick or a temp) is where a break costs the most: in section 01 it threw away more than half of the detail.
14. Nodes to paste in Nuke
Copy, then paste into the Node Graph (Ctrl+V). I pasted both into Nuke 17.0v1 and measured them.
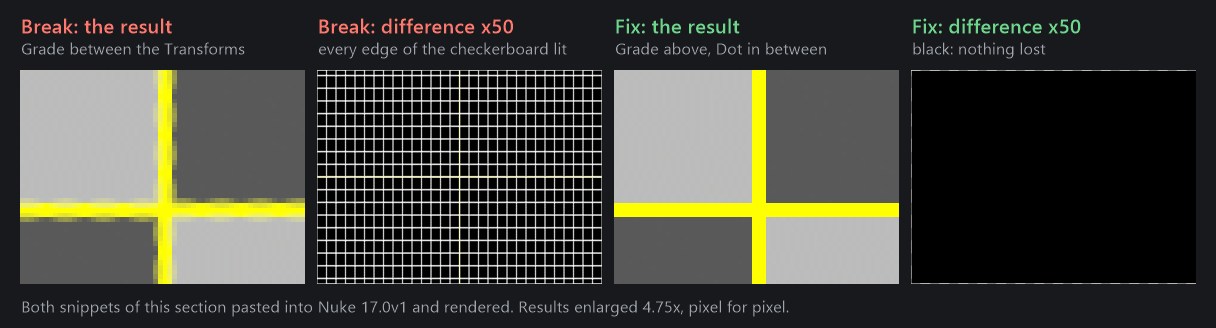
See the break: a Grade between two Transforms, and the difference against the original amplified 50 times. Disable the Grade and the difference goes black (measured: mean 0.0024 with the Grade, 0 without).
set cut_paste_input [stack 0]
version 17.0 v1
CheckerBoard2 {
 inputs 0
 format "1920 1080 0 0 1920 1080 1 HD_1080"
 name CheckerBoard_test
 xpos 0
 ypos -200
}
set N7c01 [stack 0]
Transform {
 rotate 7
 center {960 540}
 name Transform_rotate_in
 xpos 0
 ypos -120
}
Grade {
 name Grade_breaks_it
 label "disable me"
 xpos 0
 ypos -80
}
Transform {
 rotate -7
 center {960 540}
 name Transform_rotate_out
 xpos 0
 ypos -40
}
push $N7c01
Merge2 {
 inputs 2
 operation difference
 name Difference
 xpos 160
 ypos -40
}
Grade {
 white 50
 name Amplify_x50
 label "black = no loss"
 xpos 160
 ypos 0
}
The fix: the Grade moved above the stack, a Dot between the Transforms. The difference is black (measured: 0).
set cut_paste_input [stack 0]
version 17.0 v1
CheckerBoard2 {
 inputs 0
 format "1920 1080 0 0 1920 1080 1 HD_1080"
 name CheckerBoard_test
 xpos 0
 ypos -200
}
set N7c02 [stack 0]
Grade {
 name Grade_moved_up
 xpos 0
 ypos -160
}
Transform {
 rotate 7
 center {960 540}
 name Transform_rotate_in
 xpos 0
 ypos -120
}
Dot {
 name Dot_is_fine
 xpos 34
 ypos -76
}
Transform {
 rotate -7
 center {960 540}
 name Transform_rotate_out
 xpos 0
 ypos -40
}
push $N7c02
Grade {
 name Grade_same
 xpos 160
 ypos -160
}
Merge2 {
 inputs 2
 operation difference
 name Difference
 xpos 160
 ypos -40
}
Grade {
 white 50
 name Amplify_x50
 label "black = no loss"
 xpos 160
 ypos 0
}
15. Videos
 Filtering, concatenation and scaling (Hugo's Desk)
 Concatenate (Pixel Fondue)
 Transforms, part 2 (Foundry)
 Unleash the Node: Transform (Split The Diff)
16. Read more
- Ivan Busquets: Concatenation of transforms in Nuke (Nukepedia), the reference article
- Foundry: How Nodes Concatenate
- Foundry: Choosing a Filtering Algorithm
- Foundry: Transforming in 2D
- Foundry: the TransformMasked node
- Foundry: the Reformat node
- Ben McEwan: a brief lesson on image filtering and node concatenation
- Kenn Hedin Kalvik: best practices for compositing in Nuke (concatenation, filtering, ID passes)
- Kenn Hedin Kalvik: Warp Transform, a coordinate map through any transform
- Ben McEwan: demystifying ST Maps
- Ben McEwan: speed up your Nuke scripts by compositing efficiently
- Nukepedia: 10 tips to optimising Nuke and creating efficient workflows
- Foundry Learn: Node Pro Tips with Sebastian Schütt (concatenation and MergeMat)
- Filtering and resampling: the kernels, measured
- The Transform matrix
- CornerPin and homography
- STMap: undistort and redistort
- TimeOffset in Nuke
- Compositing: topics, books and free material