You have a JPEG. You open it in Windows Photos and it looks perfect. You bring it into Nuke with the default color management and everything is fine: the image looks exactly the same.
Then you switch your project to ACES... and suddenly the same image looks darker, flatter, different. What happened? Which colorspace should you pick in the Read node? Utility - sRGB - Texture? Output - sRGB? matte_paint? color_picking?
In this article I will explain what is really going on, why the white value becomes ~16, and how to decide which interpretation is right for your comp.
Here you will find some example on how to read an 8 bit image with the different versions of Nuke and ACES. Download examples with ACES 1.2 and 1.3
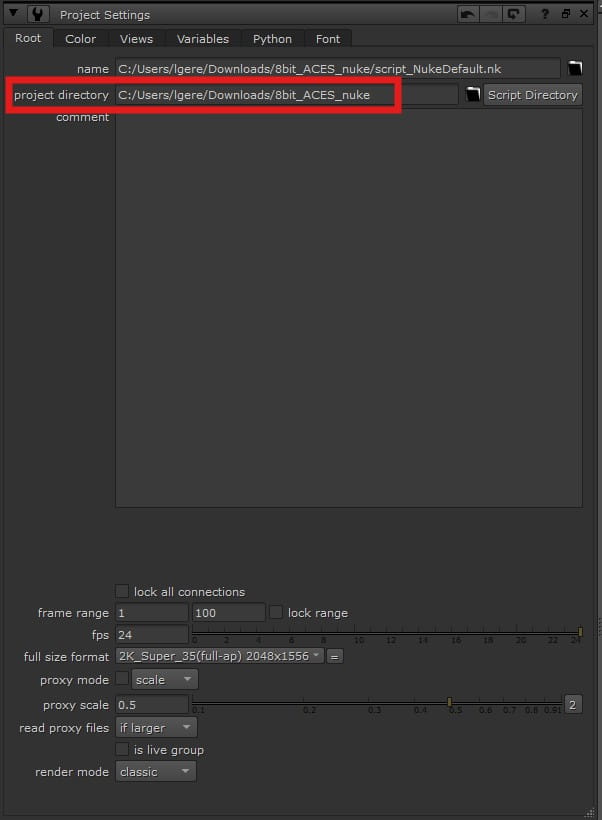
Remember to open directly the scripts and change the path of your Project Directory in the Project Settings. You will find all the images working perfectly
Index
- 00. Intro: what are OCIO and ACES?
- 01. Nuke default: no problem at all (and why we don't use it)
- 02. The real problem: display-referred vs scene-referred
- 03. Why the image looks different in ACES
- 04. Option A: Utility - sRGB - Texture
- 05. Option B: Output - sRGB (inverted)
- 06. Why white becomes ~16 (ACES 1.2/1.3) or ~128 (ACES 2.0)
- 07. Which one should you use?
- 08. ACES versions in Nuke: 1.2 vs 1.3 vs 2.0
- 09. Interpreting 8-bit files in Nuke 17 (ACES 1.3 and 2.0)
- 10. Going deeper: light, photography & imaging
- 11. Useful links
00. Intro: what are OCIO and ACES?
Before anything else, let's define two terms you'll see constantly: OCIO and ACES.
ACES stands for Academy Color Encoding System — and "Academy" is exactly the one you're thinking of: the Academy of Motion Picture Arts and Sciences, the Oscars people. It is a color management standard born in the film industry, and its purpose is to make every piece of software in the pipeline speak the same language — Maya, Nuke, Arnold, the grading suite — so that color stays consistent from the first render to the final delivery.

OCIO — OpenColorIO — is the engine that manages color inside Nuke and virtually every production software. It controls how every image is read, processed and displayed on screen. Originally developed at Sony Pictures Imageworks, it is now an open-source project maintained by the Academy Software Foundation.

In simple terms: OCIO is the engine, ACES is the standard that the engine applies. In Nuke you pick OCIO as your color management, then you load an ACES config — and from that moment every Read node, every Viewer and every Write node speaks ACES.
01. Nuke default: no problem at all (and why we don't use it)
Let's start from the easy case. Open Nuke with the default color management (Project Settings → Color → color management: Nuke, OCIO config: nuke-default) and read your JPEG.
Read1
  colorspace: sRGB   # nuke-default
Nuke removes the sRGB gamma on read (so you work in linear internally) and the viewer applies the same sRGB gamma back on display. The two operations cancel out perfectly: your JPEG looks exactly like it does in Windows Photos. White is 1.0, everything is simple, everything matches.
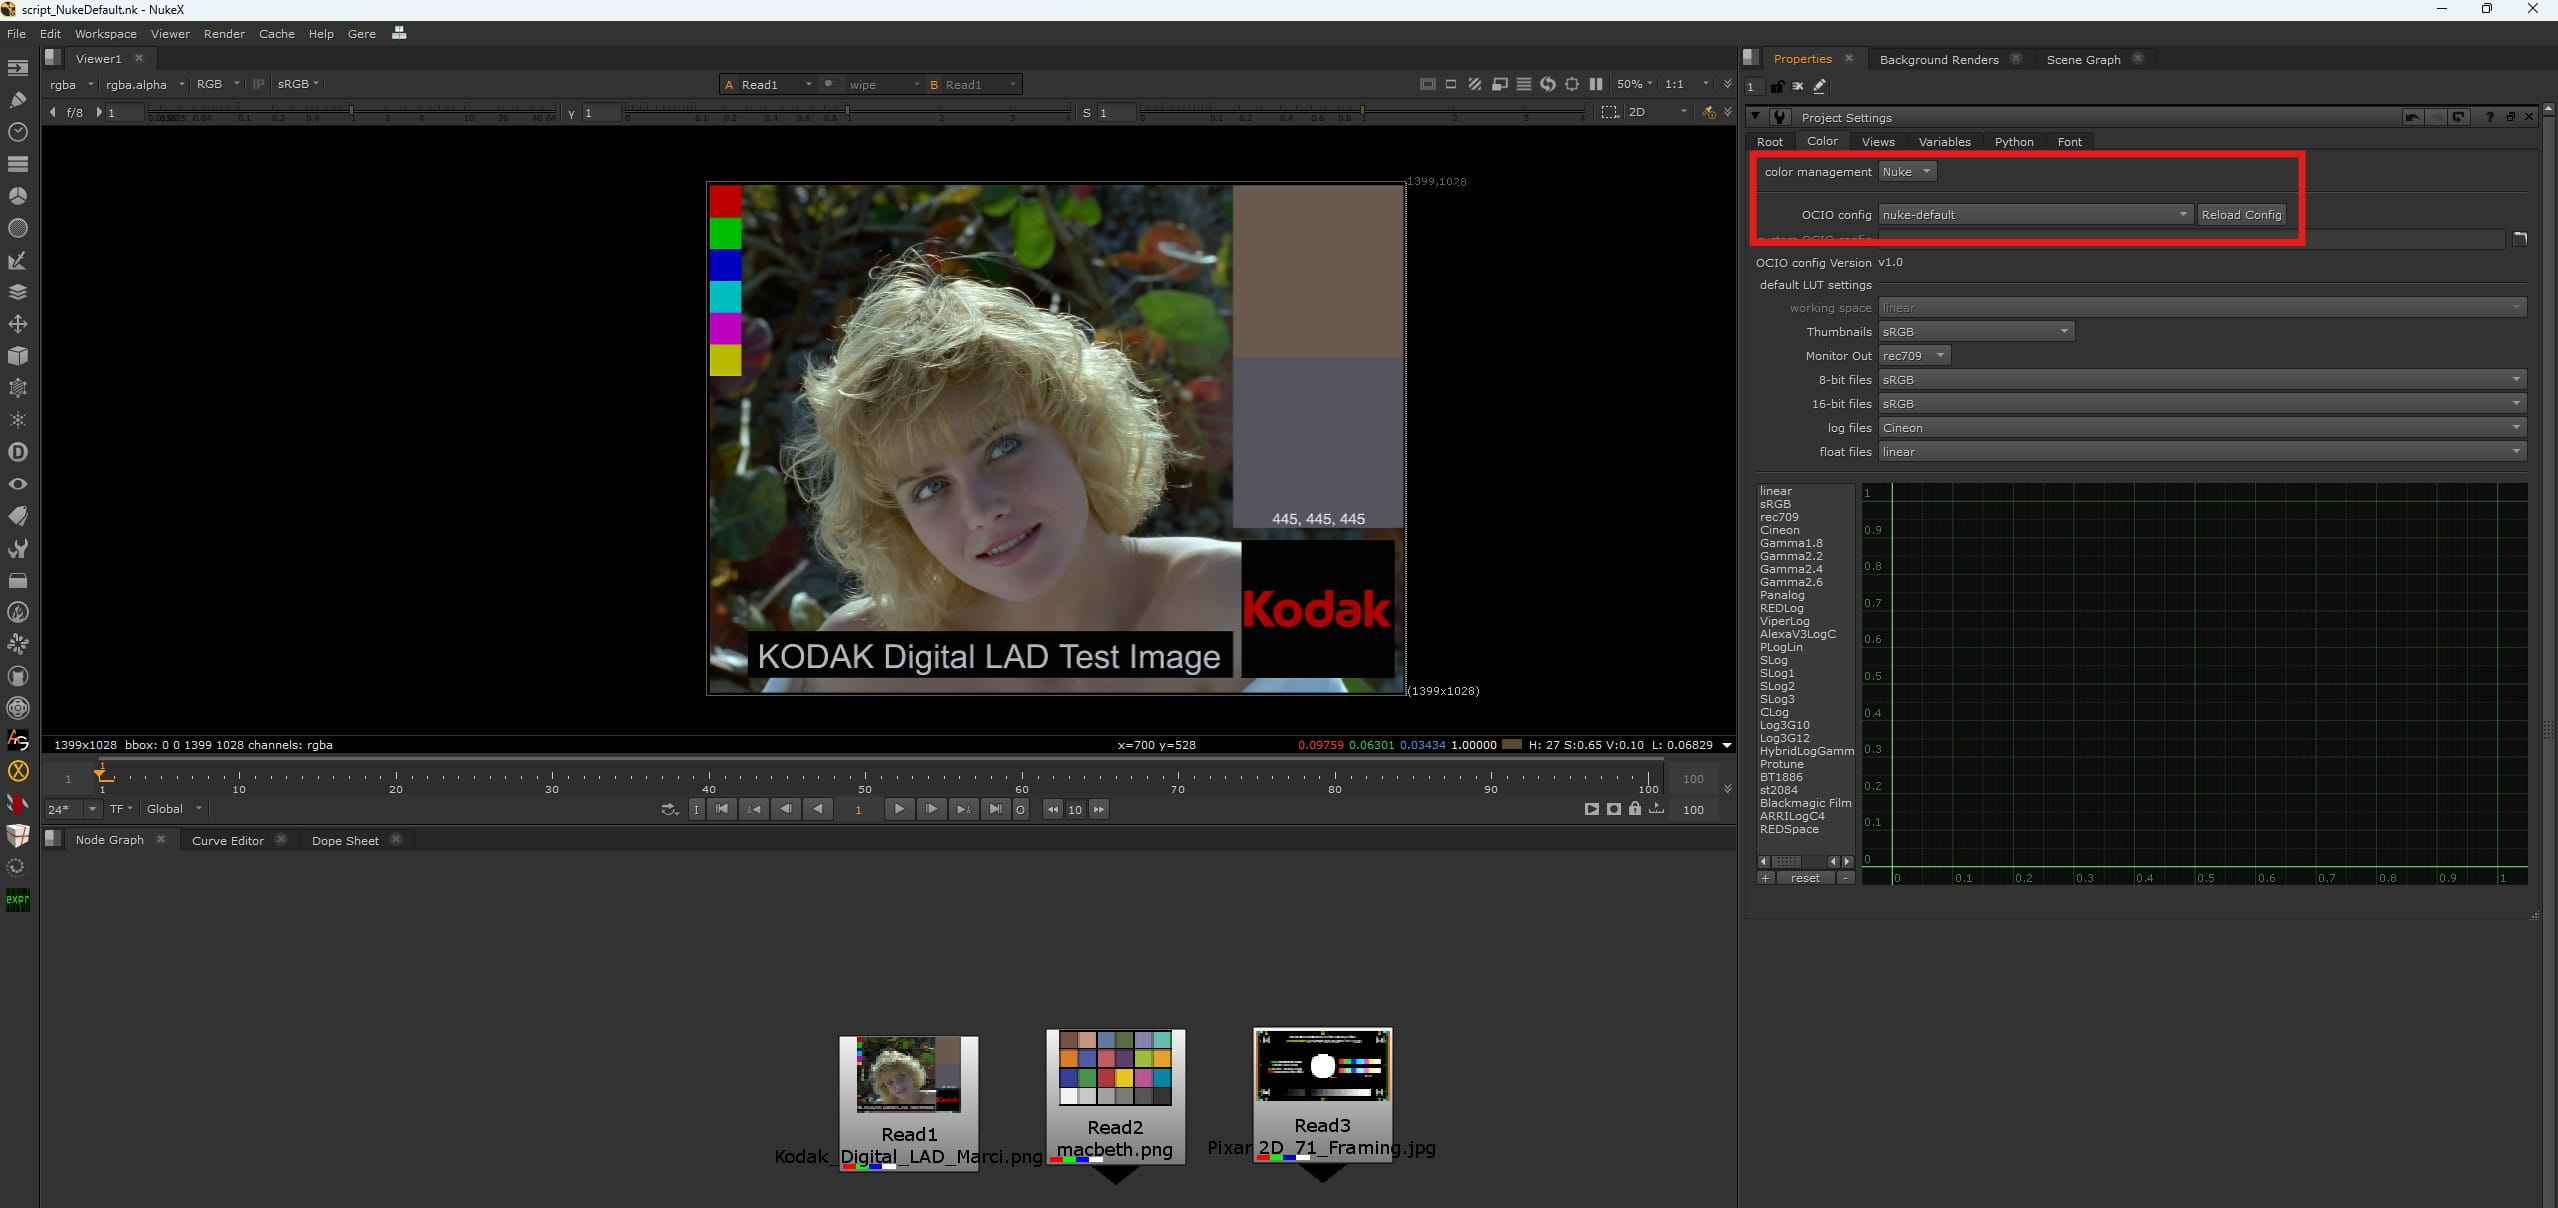
Same JPEG: Windows Photos and Nuke viewer (nuke-default). Identical.
This is why for years nobody worried about this topic: with nuke-default, an 8-bit image just works. The viewer transform is a plain gamma curve, not a filmic one — nothing gets tone-mapped, nothing shifts.
Why we don't work in Nuke default
So if everything works, why leave it? Let's take our concrete case. Our footage is not a professional cinema file: it's a simple mp4 — the same kind of file a phone would produce. A file already prepared for a screen. And yet, we want to work in ACES.
Here is why we don't stay in Nuke default: in a comp, you never work with just one element. There's the footage, but there are also 3D renders, stock elements, textures, matte paintings. ACES exists to make all of these elements live in the same coherent space, under the same viewing transform. It is the common meeting point. If we worked in Nuke default, every element would speak a different language, and the colors would never match.
Our mp4 is not ACES to begin with — but we bring it into ACES. We import it, we tell Nuke what its source colorspace is, and from there Nuke converts it into the working space. From that moment on, it speaks the same language as everything else in the comp.
The problem starts the moment you switch the project to ACES. Same Read node, same file — but now the image looks darker and flatter, and you have to make a decision you never had to make before.
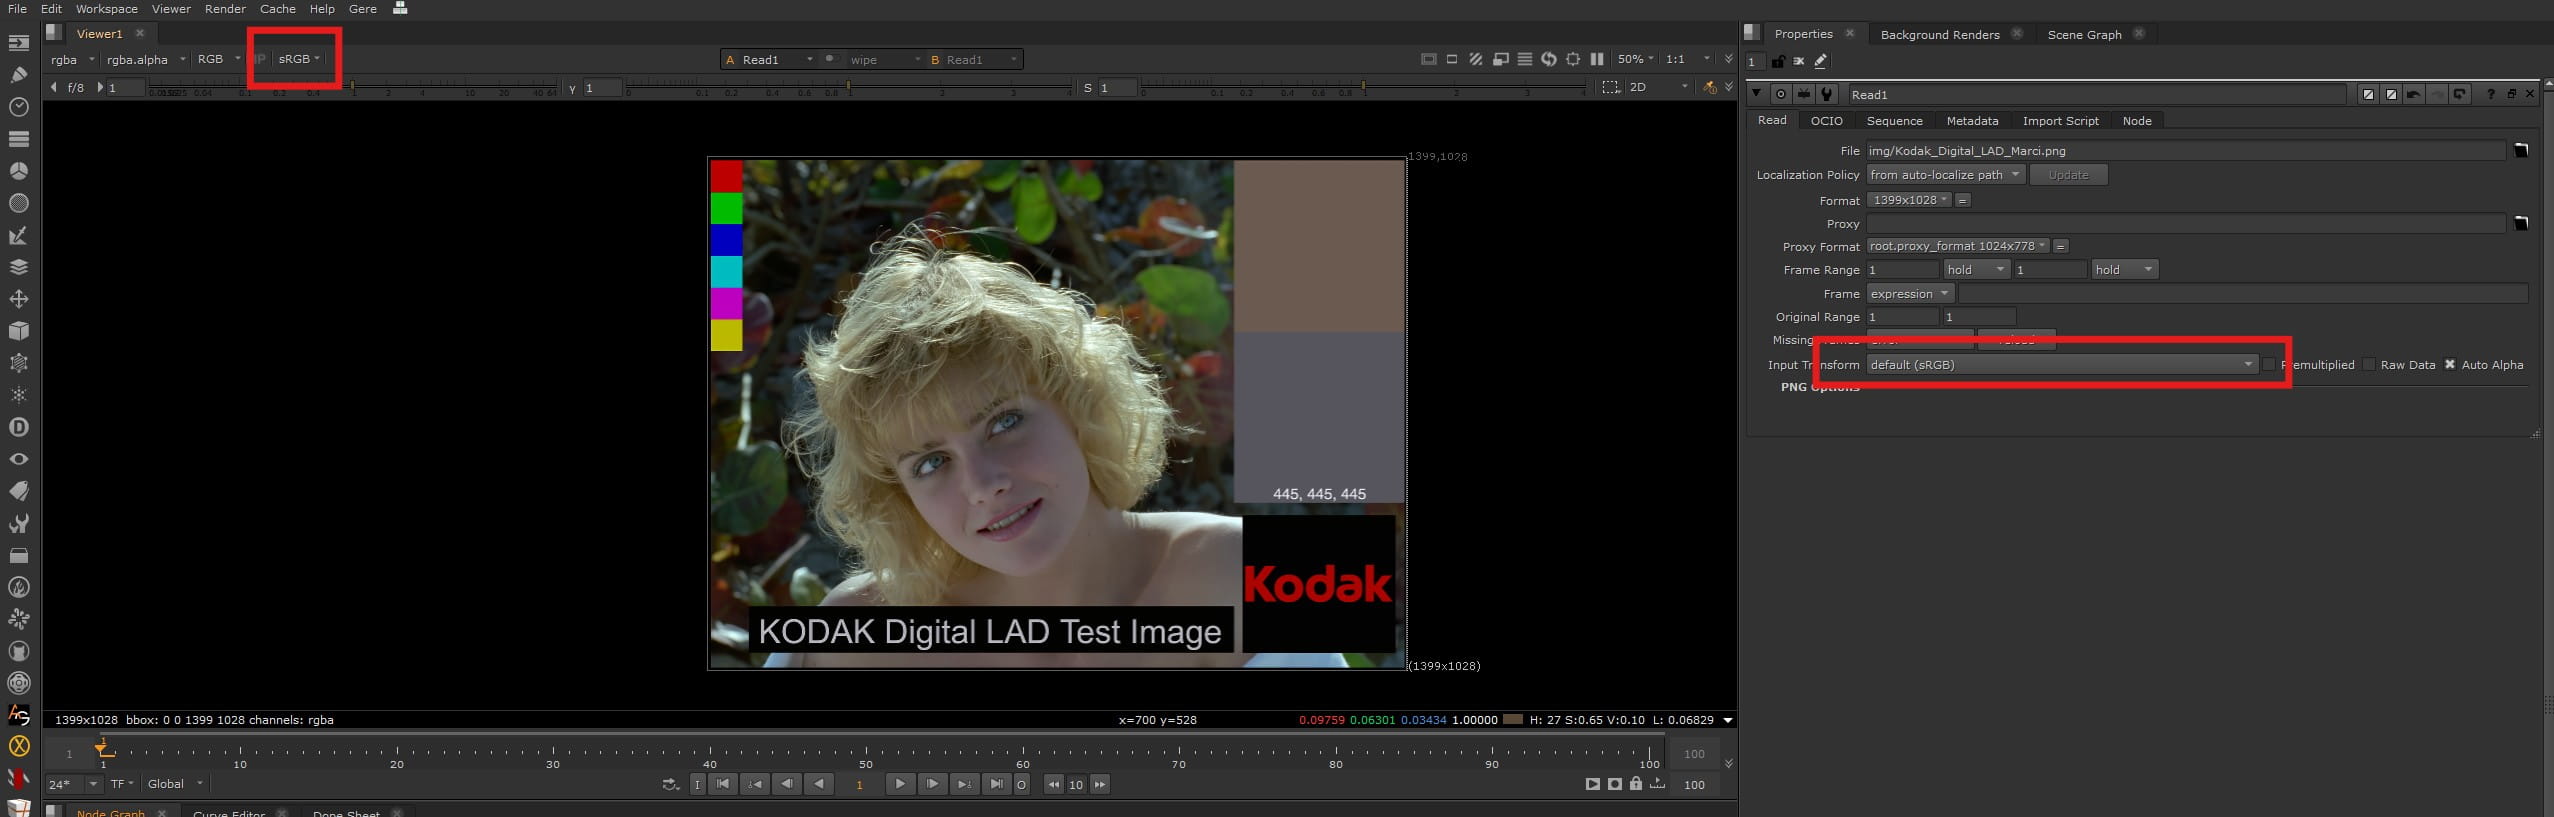
Same JPEG, same Read node: nuke-default vs ACES with Utility - sRGB - Texture.
02. The real problem: display-referred vs scene-referred
A JPEG is a display-referred image. It was already processed, tone-mapped and encoded with the sRGB gamma curve so it looks correct on a monitor. All its values live between 0 and 1, where 1.0 means "white on screen". There is no information left about the original scene — just pixels optimized for a display.
ACES instead works in a scene-referred space. Every pixel value represents a physical quantity of light, with no ceiling: the sun can be 1000, a white wall 0.9, a specular highlight 50.
Here is the uncomfortable truth: there is no mathematically correct way to convert a display-referred image into scene-referred values. The original scene information is simply gone. Every option you have in the Read node is a different assumption about what your image represents — not a "fix".
In Nuke's default (non-ACES) color management this problem doesn't exist: the viewer applies a simple sRGB gamma and your JPEG looks identical to Windows Photos. The problem appears only when the ACES view transform enters the game.
03. Why the image looks different in ACES
When ACES is active, the Nuke viewer never shows you the raw pixel values. It always applies the ACES Output Transform (technically called RRT + ODT) to convert your working space (ACEScg) into something your monitor can display.
Since these acronyms show up everywhere in the ACES world (forums, docs, dropdown menus), here is what they actually mean — in plain words:
IDT — Input Device Transform. The "entrance door": it converts footage from its source encoding (camera log, sRGB, a texture...) into ACES. When you pick a colorspace in the Read node, you are choosing an IDT. In newer configs it's simply called Input Transform.
RRT — Reference Rendering Transform. The "film look" part: a fixed tone curve that compresses highlights smoothly instead of clipping them, adds cinematic contrast, and handles very bright values gracefully. It is the same for everyone, on every display.
ODT — Output Device Transform. The "exit door": it adapts the result of the RRT to your specific display — sRGB monitor, Rec.709 broadcast, P3 cinema projector, HDR. Each display type has its own ODT.
RRT and ODT are always applied together in the viewer, which is why ACES documentation often merges them into a single term: the Output Transform (and ACES 2.0 officially unified them into one).
In simple words: it is a filmic curve. It rolls off the highlights instead of clipping them, it adds contrast in a cinematic way, and it assumes your scene values can go far above 1.0 — like a real CG render with physical lights would.
Your JPEG, however, has everything compressed between 0 and 1. When the ACES filmic curve is applied on top of it, the image gets pushed down: mid-tones darker, contrast flatter, highlights dimmer. This is not a bug. It is ACES doing exactly what it was designed to do — it just wasn't designed for images that are already tone-mapped.
So the real question becomes: how do I want my 8-bit image to enter this pipeline? There are two possible answers, and conceptually they are two different interpretations:
Scene-referred with limited range (0-1) → treat the values as physical surface properties (a texture, an albedo, a matte painting)
Inverted display-referred → treat the image as a photo already tone-mapped for a screen, and try to reconstruct the scene values that could have generated it
04. Option A: Utility - sRGB - Texture
This is the option Nuke picks by default for 8-bit files in an ACES config (the OCIO role matte_paint — and also color_picking — are mapped exactly to sRGB - Texture).
Read1
  colorspace: matte_paint (Utility - sRGB - Texture)
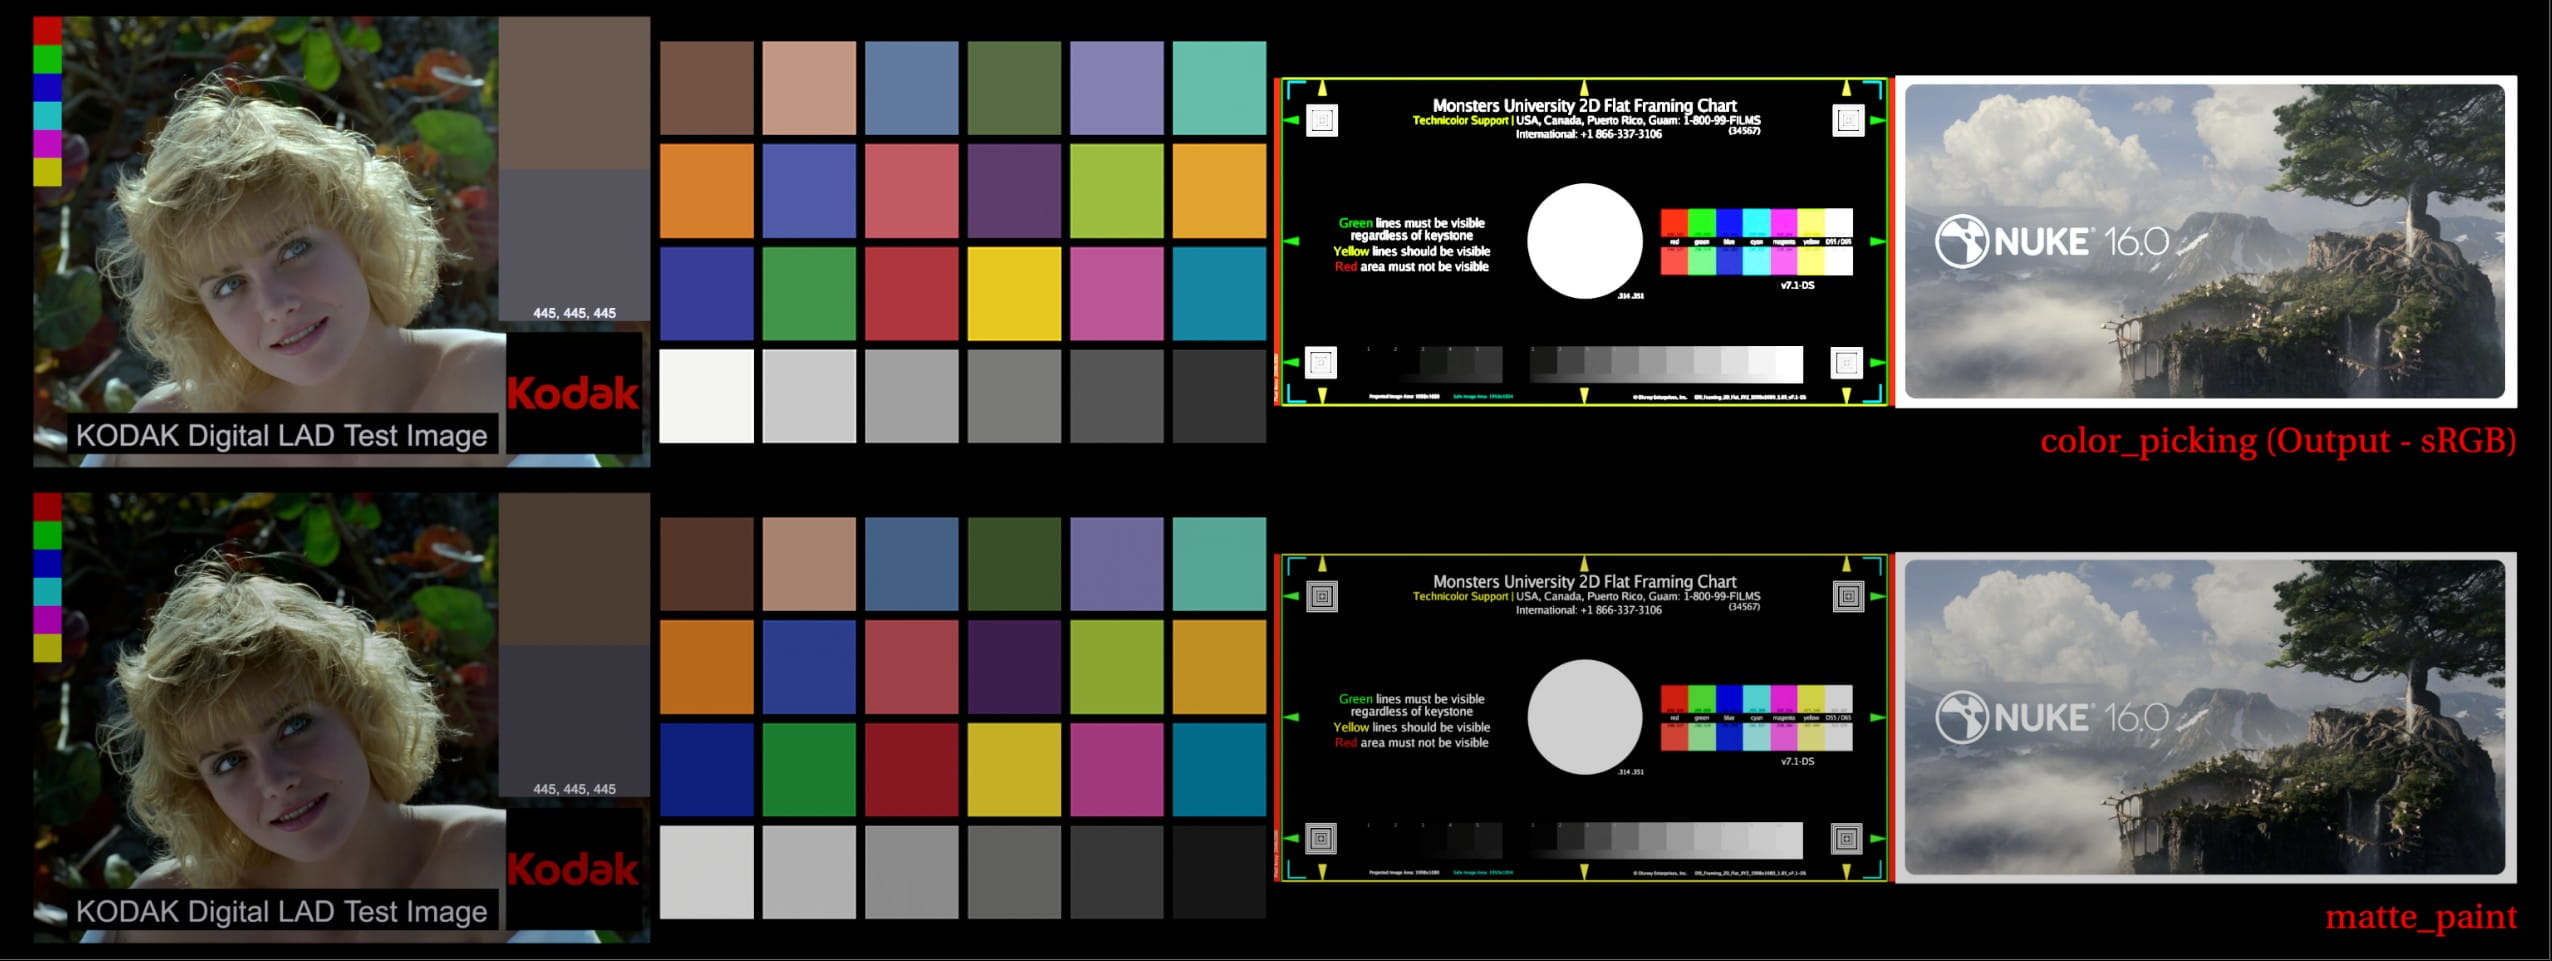
The Read node with the colorspace dropdown: Utility - sRGB - Texture.
What it does: it removes the sRGB gamma (linearization) and nothing else. A white pixel (1.0 in the file) stays at 1.0 in ACEScg. No value can ever go above 1.
The consequence: the image will look darker and flatter in the ACES viewer compared to Windows Photos, because the filmic view transform compresses it. This is expected and correct. The fix is not to change colorspace — the fix is to add a Grade/Exposure node and adjust the brightness until the element sits well in your scene.
This interpretation treats the image as a material: a surface, a texture, a piece of content that reflects light but does not emit it.
05. Option B: Output - sRGB (inverted)
Read1
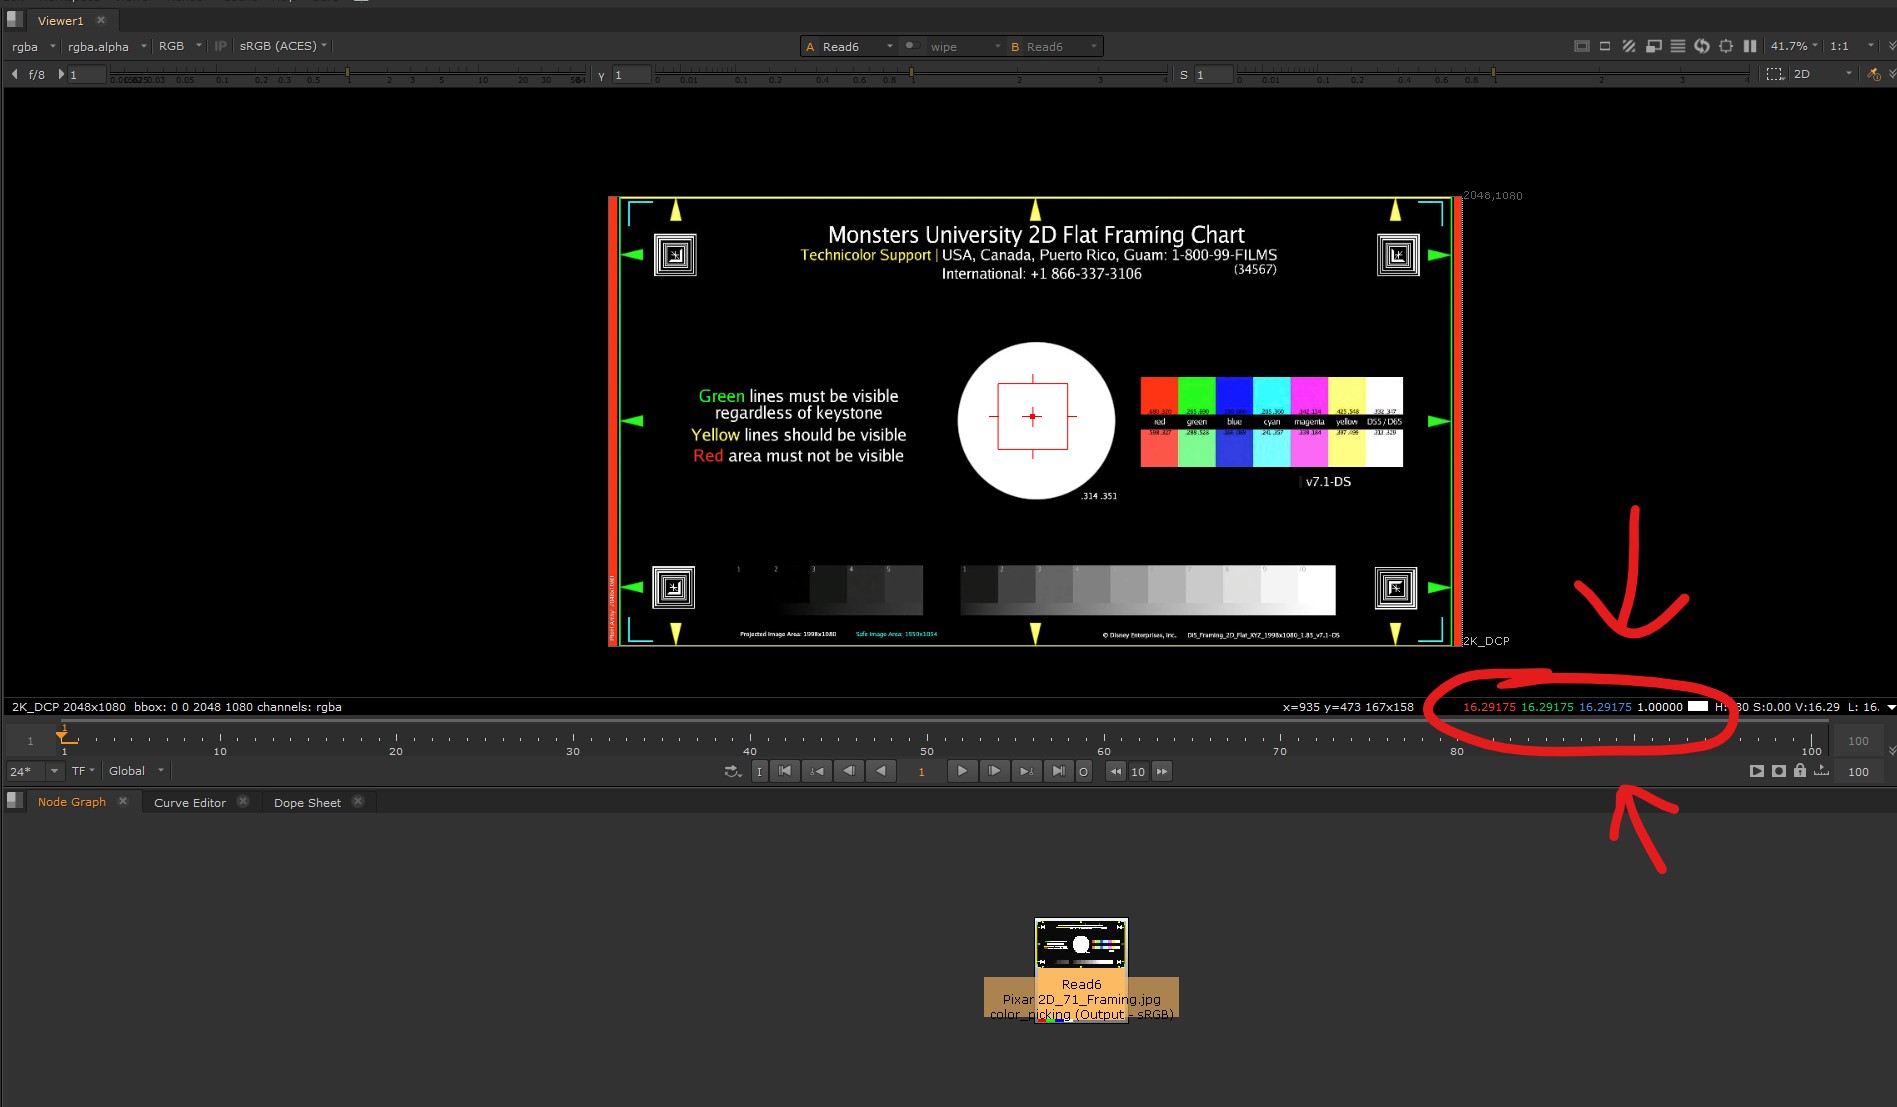
  colorspace: color_picking(Output - sRGB)
This option applies the inverse of the ACES display transform. The logic: "this JPEG is what an ACES render would look like after the Output Transform — so let's walk backwards and reconstruct the scene values".
The visual result is magic: the image in the ACES viewer looks identical to Windows Photos. Why? Because the inverse transform on read and the forward transform in the viewer cancel each other out.
But there is a price: internally, your white pixels are now sitting at a value of ~16 in ACEScg. Every bright area of the image explodes above 1.0. If you then grade, merge with CG renders, pull a key or do any physically-based operation, the behaviour can become unpredictable.
This interpretation treats the image as a photograph of a scene: the bright pixels might represent real light sources (sun, fire, sky), and it gives them real scene-linear energy.
06. Why white becomes ~16 (ACES 1.2/1.3) or ~128 (ACES 2.0)
This is the number that confuses everyone, so let's demystify it.
The ACES display transform is designed so that a 18% grey (0.18 in scene-linear — the classic photographic grey card) lands in the middle of your display range. From there, the filmic curve compresses everything above it, rolling off smoothly toward display white.
The 18% grey patch of a Macbeth chart: 0.18 in scene-linear is the anchor of the whole ACES tone curve.
The curve reaches display white (1.0 on screen) at a scene-linear value of about 16.3. In photographic terms, that is 6.5 stops above middle grey:
0.18 x 2^6.5 = 16.3
So ~16 is not an arbitrary constant written in a specification. It is simply the point where the ACES filmic curve saturates to white. Everything between 0.18 and 16.3 gets compressed into your display range; everything above 16.3 clips to pure white.
When you read a JPEG with Output - sRGB, you are walking that curve backwards: a display white (1.0) lands exactly at the top of the curve, which is ~16 in scene-linear. That's the whole story — for ACES 1.2 and 1.3, which share the same display rendering transform.
ACES 2.0 changes this number completely. The tone scale was redesigned from scratch (a Michaelis-Menten type curve, parameterized on the peak luminance of the target display), with a much gentler highlight rolloff. The result: the curve needs far more scene-linear range before it saturates to display white. Repeat the same inversion test with the ACES 2.0 - SDR 100 nits view transform, sample a white pixel, and you get:
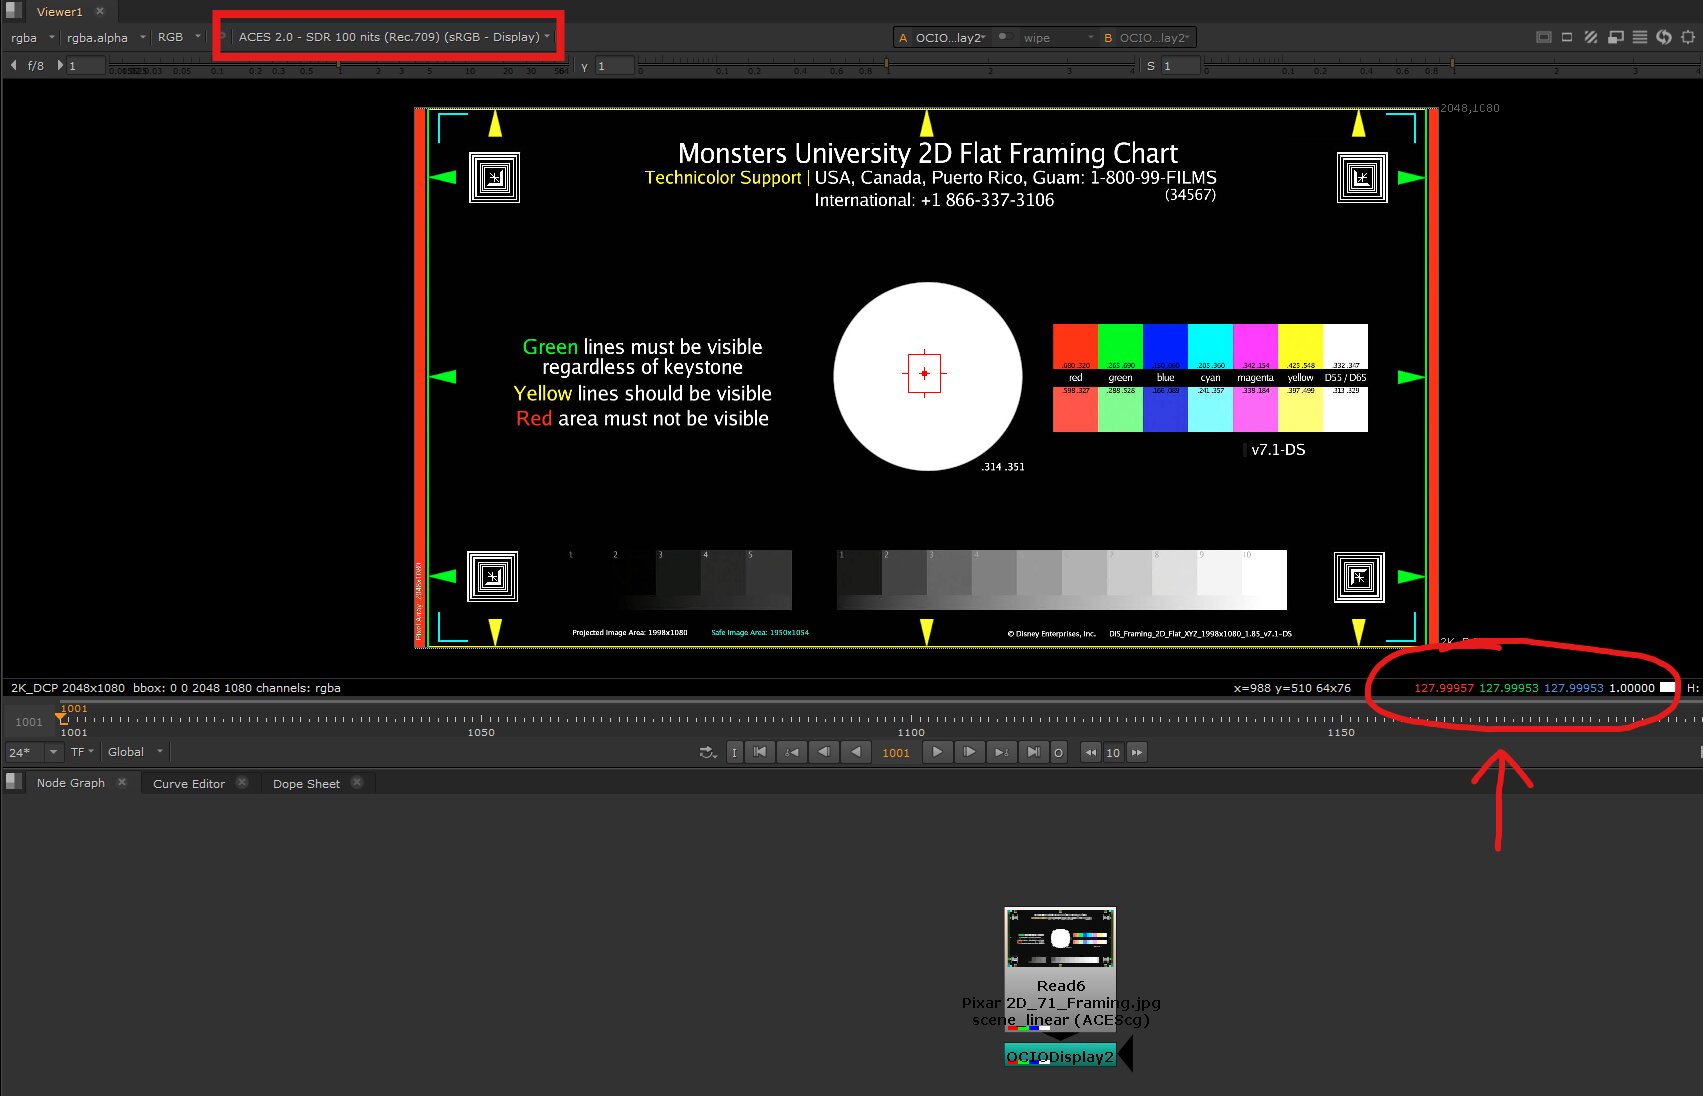
The same inversion test with the ACES 2.0 - SDR 100 nits view: display white samples at 127.99957 ≈ 128.
~128, which is roughly 9.5 stops above middle grey:
0.18 x 2^9.5 = 130 (measured: 127.99957 with the SDR 100 nits view)
In other words, ACES 2.0 gives the highlights about 3 extra stops of headroom before reaching white — that is exactly why its rolloff looks softer and keeps more detail in the bright areas. Note also that in 2.0 the saturation point is no longer a single fixed number: it depends on the peak luminance of the target (higher-nit HDR targets push it even further up).
07. Which one should you use?
Ask yourself: what does this image represent in my comp?
A texture for a 3D shader (albedo, diffuse map) → always Utility - sRGB - Texture. An albedo above 1.0 would make the surface emit light and break physically-based shading.
A matte painting or graphic element → Utility - sRGB - Texture, then Grade to taste. Warn the matte painter that the image will look different under the ACES view transform — that's normal.
A photo/stock plate to integrate with CG renders or log footage → Utility - sRGB - Texture + Grade/Exposure to match the scene. Values stay controllable and predictable. This is the workflow recommended on ACES Central.
An element with emissive content (fire, sun, neon, practical lights) that must behave as a light source → Output - sRGB can make sense: the bright areas get real energy above 1.0 and glows/light-wraps react correctly. Just be aware of what you're doing.
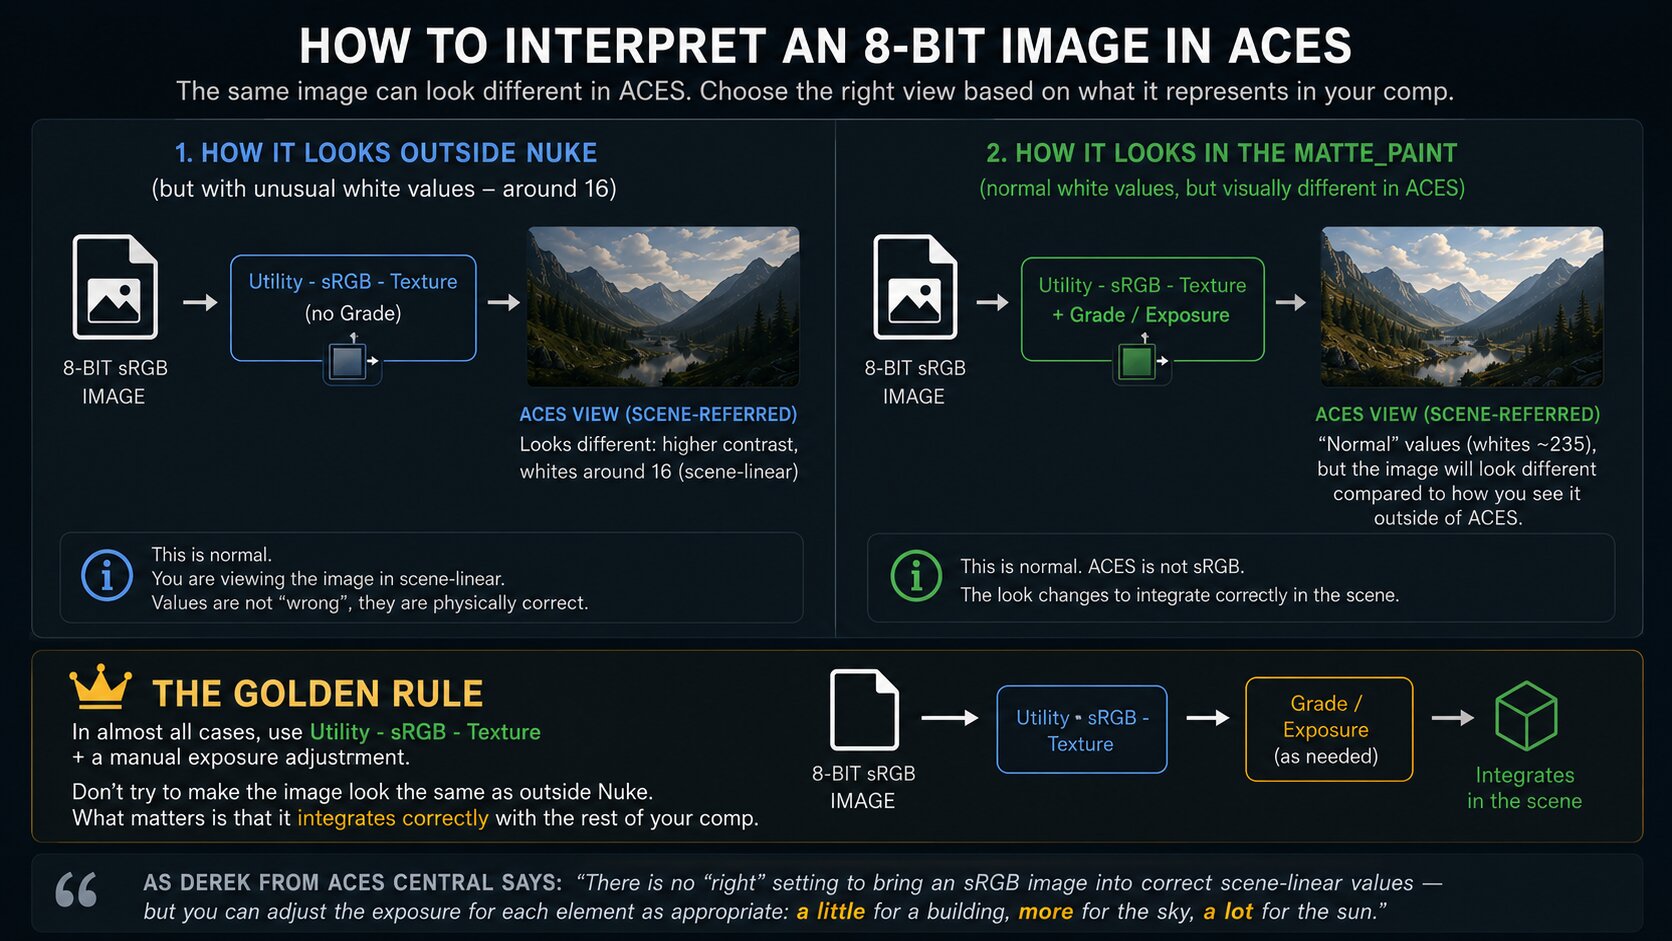
The golden rule: in most cases, Utility - sRGB - Texture + a manual exposure adjustment is the professional choice. Yes, the image looks different from Windows Photos in the viewer — accept it. You are in a scene-referred pipeline now: what matters is not that the image looks like it did on your desktop, but that it integrates correctly with the rest of your comp.
As Derek from ACES Central puts it: there is no "right" setting to bring an sRGB image into correct scene-linear values — but you can adjust the exposure for each element as appropriate: a little for a building, more for the sky, a lot for the sun.
08. ACES versions in Nuke: 1.2 vs 1.3 vs 2.0
One more thing: not all Nuke versions ship the same ACES, and this changes both the names you see in the colorspace dropdown and the look of the view transform.
Nuke 16 and below → ships with ACES 1.2 (aces_1.2 OCIO config). Colorspace names like Utility - sRGB - Texture and Output - sRGB.
Nuke 17 and above → ships with ACES 1.3 and ACES 2.0 (studio-config / cg-config OCIO v2). Some colorspaces are renamed (e.g. sRGB - Texture, sRGB - Display) and the roles are mapped differently.
Important clarification: ACES 1.2 and 1.3 have the identical display rendering transform. They only differ in the standard names used in the shipped OCIO configs and in the legacy OCIO version they support (1.2 works with older OCIO than 1.3). The real change of ACES 1.3 is the Reference Gamut Compression for highly saturated colors, not the tone curve you see on screen. In practice, for the topic of this article, using 1.2 or 1.3 makes no visible difference — the white still lands at ~16.
ACES 2.0 is a different story: that is where the display rendering transform was actually redesigned, with a lower default contrast and a softer highlight rolloff. So the numbers and the look change only when you move to 2.0.
The takeaway: going from 1.2 to 1.3 is invisible for this article's topic (same curve, white still at ~16). Going to 2.0 genuinely changes the tone curve — highlights roll off more gently and sit lower on the scale, so if you invert it, a display white will not land at 16.3 anymore.
So if you follow an older tutorial with Nuke 17, or open an old script, names may not match. The concepts in this article stay valid for every version — only the labels change (and, with 2.0, the exact look of the view transform).
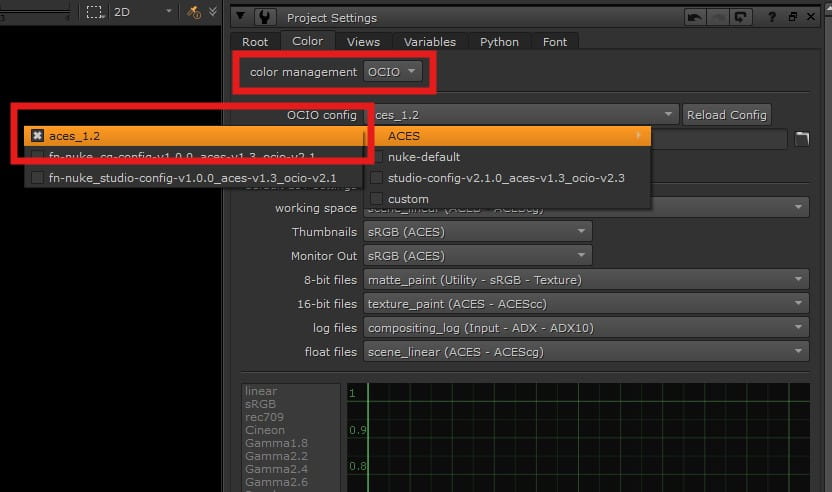
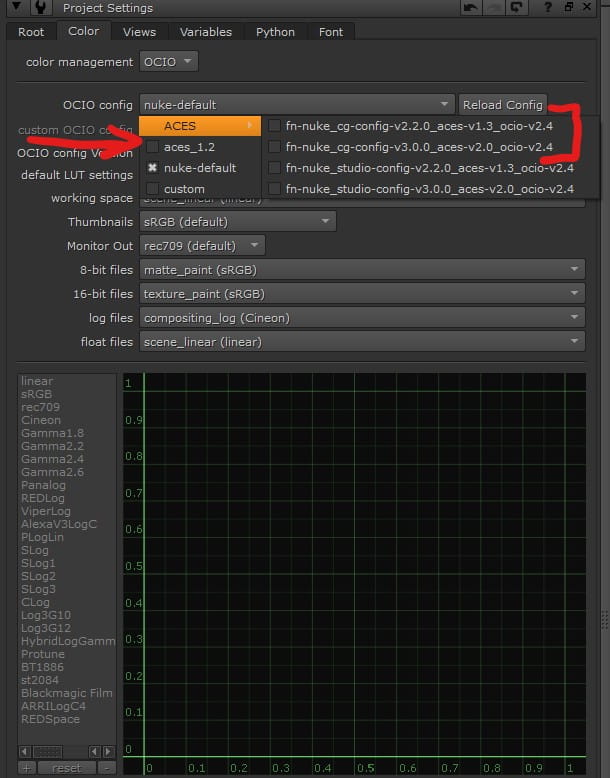
If you are on Nuke 17 but need to match a show or an old project done in ACES 1.2, you can still load the old config manually (Project Settings → Color → OCIO config: custom). You can download it here:
Download ACES 1.2 config for Nuke 17+
Copy and paste the Aces 1.2 in this folder: C:\Program Files\Nuke17.0v1\plugins\OCIOConfigs\configs
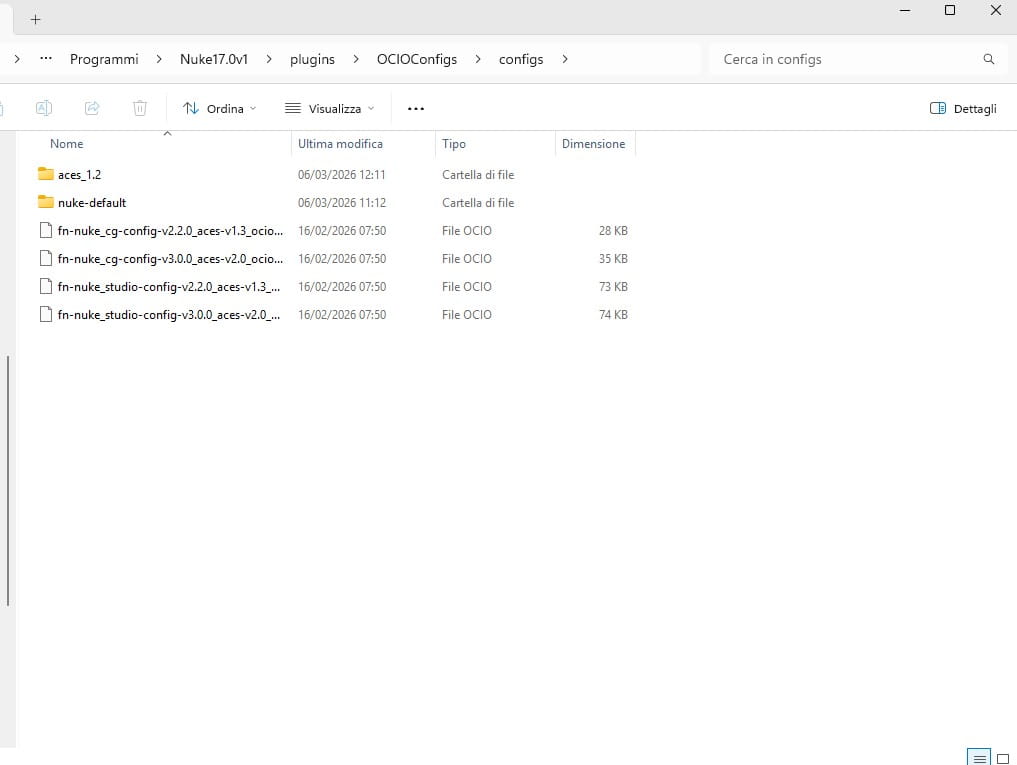
In this case when you will open Nuke 17, you will find Aces 1.2:
09. Interpreting 8-bit files in Nuke 17 (ACES 1.3 and 2.0)
Everything explained so far used the ACES 1.2 naming from Nuke 16 and below. In Nuke 17 the concepts are identical, but the OCIO v2 config (e.g. fn-nuke_cg-config-v2.2.0_aces-v1.3_ocio-v2.4) renames everything and changes how you build the inverted route. Let's look at the real thing.
First, the Project Settings. With color management set to OCIO and the ACES 1.3 config loaded, the defaults for file types are handled by roles: 8-bit files are automatically assigned to color_picking (sRGB Encoded Rec.709 (sRGB)) and 16-bit files to texture_paint (sRGB Encoded Rec.709 (sRGB)).
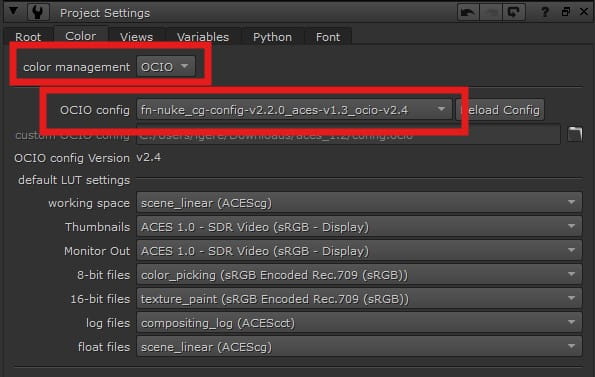
Nuke 17 Project Settings: the ACES 1.3 OCIO v2 config, with 8-bit files mapped to color_picking (sRGB Encoded Rec.709 (sRGB)).
Option A (the texture route) is therefore automatic: read your JPEG and Nuke assigns color_picking (sRGB Encoded Rec.709 (sRGB)). Same behaviour as Utility - sRGB - Texture in ACES 1.2: gamma removed, white stays at 1.0, image looks darker through the ACES view transform. Grade to integrate, done.
Option B (the inverted route) is where things really change. The old Output - sRGB colorspace does not exist anymore in the dropdown. In OCIO v2, the display transform lives in the display/view section of the config, so to walk it backwards you use the OCIODisplay node with "invert direction" enabled. There are two equivalent ways to build it:
Method 1 — read the file as scene_linear (ACEScg) (a "wrong" but neutral passthrough) and add an OCIODisplay node with: input scene_linear (ACEScg), display device sRGB - Display, view transform ACES 1.0 - SDR Video, and invert direction ON. Sample a white pixel of the logo: 16.29991. There it is.
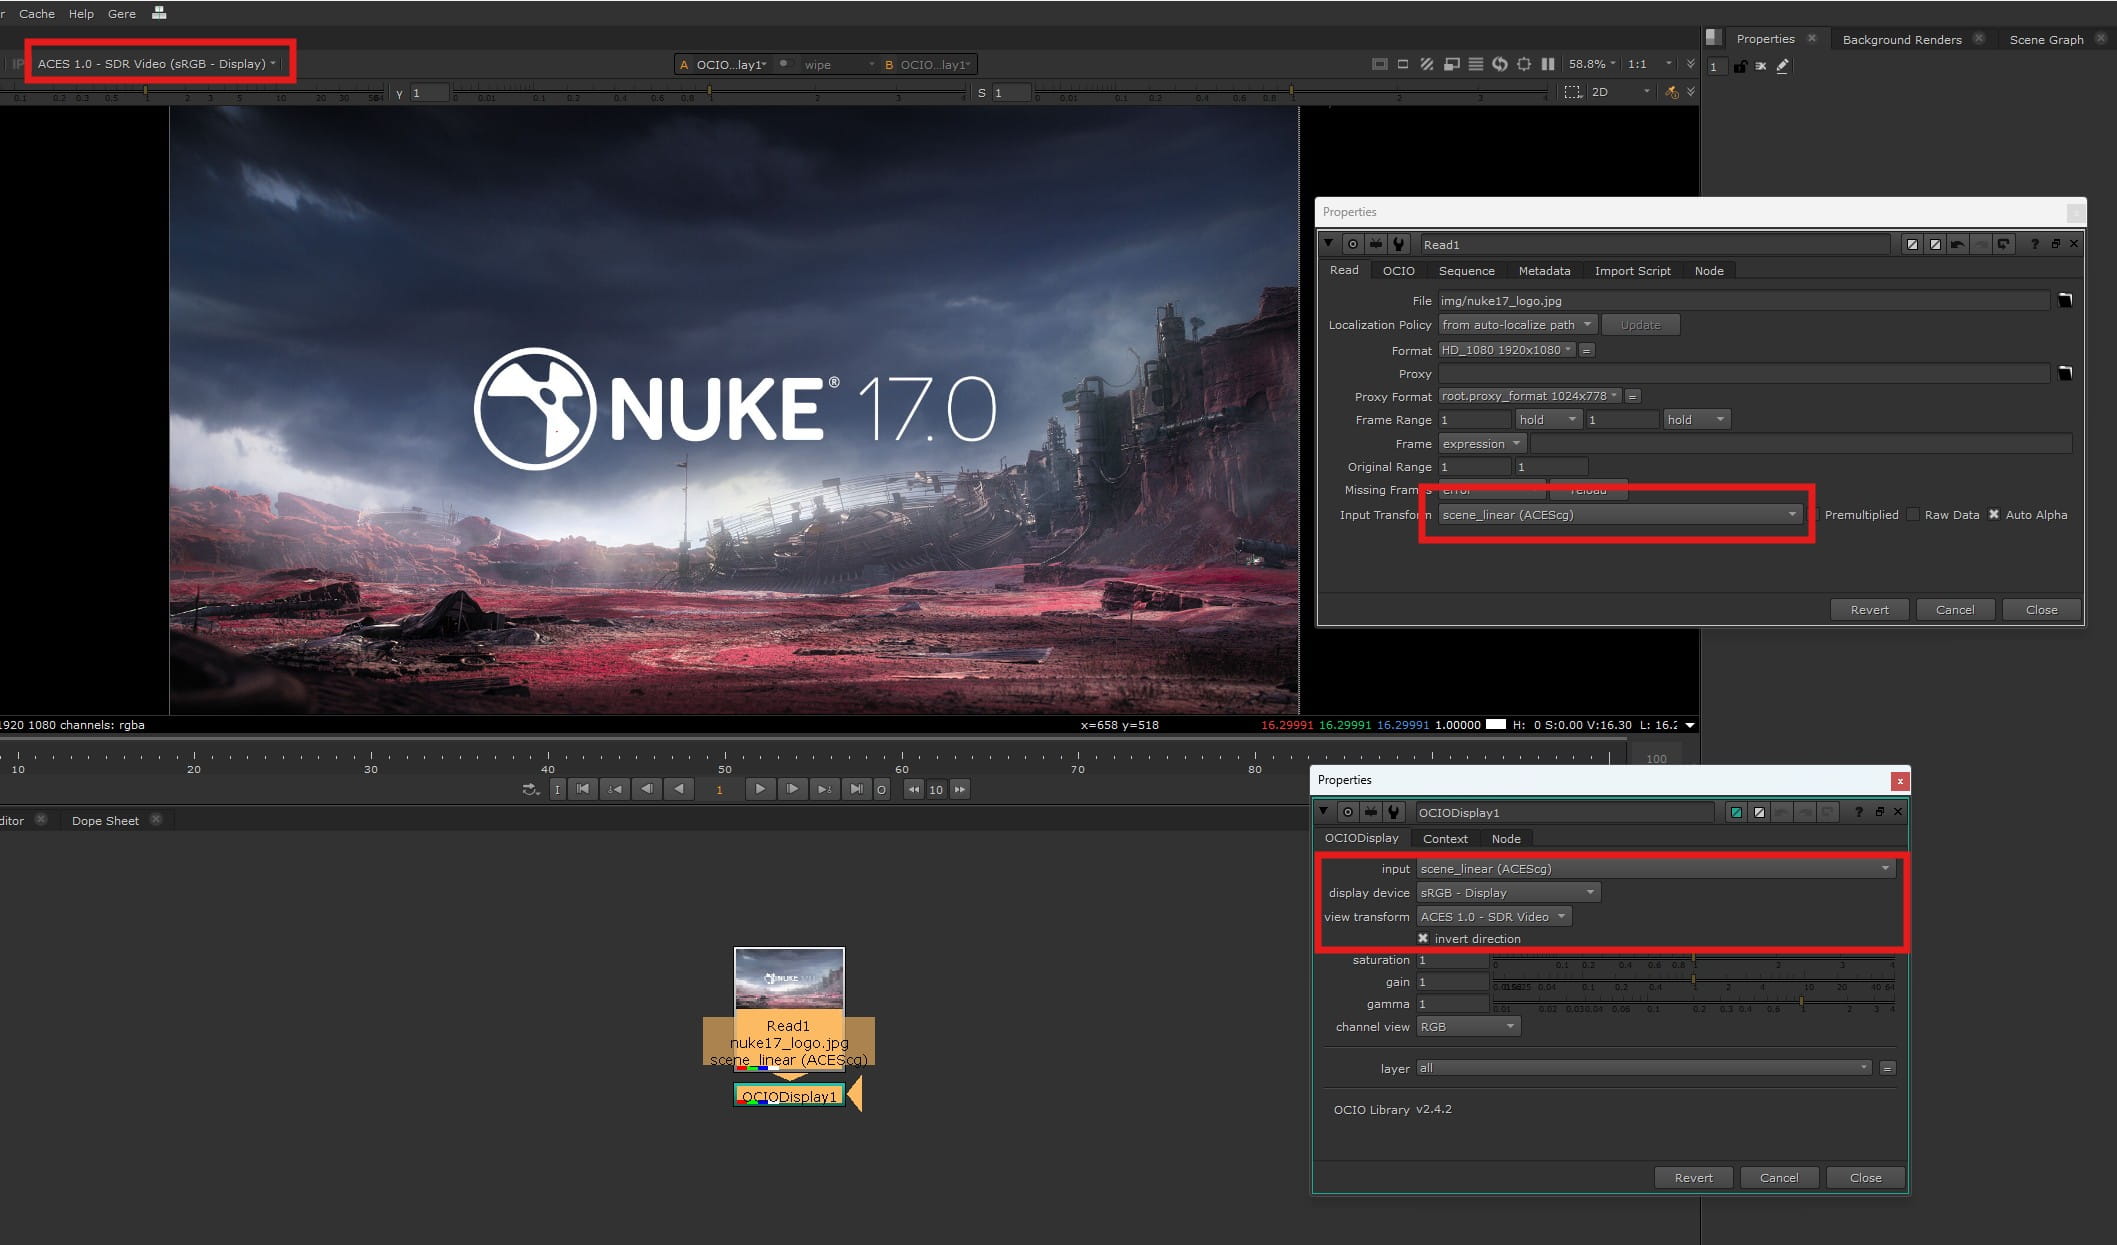
Method 1: OCIODisplay with invert direction. The white of the logo samples at 16.29991 in ACEScg.
Method 2 — read the file as data (Raw), then chain two nodes: an OCIODisplay (input texture_paint (sRGB Encoded Rec.709 (sRGB)), display sRGB - Display, view ACES 1.0 - SDR Video, invert direction ON) followed by an OCIOColorSpace from color_picking to scene_linear (ACEScg). Same result: white lands at ~16.3.
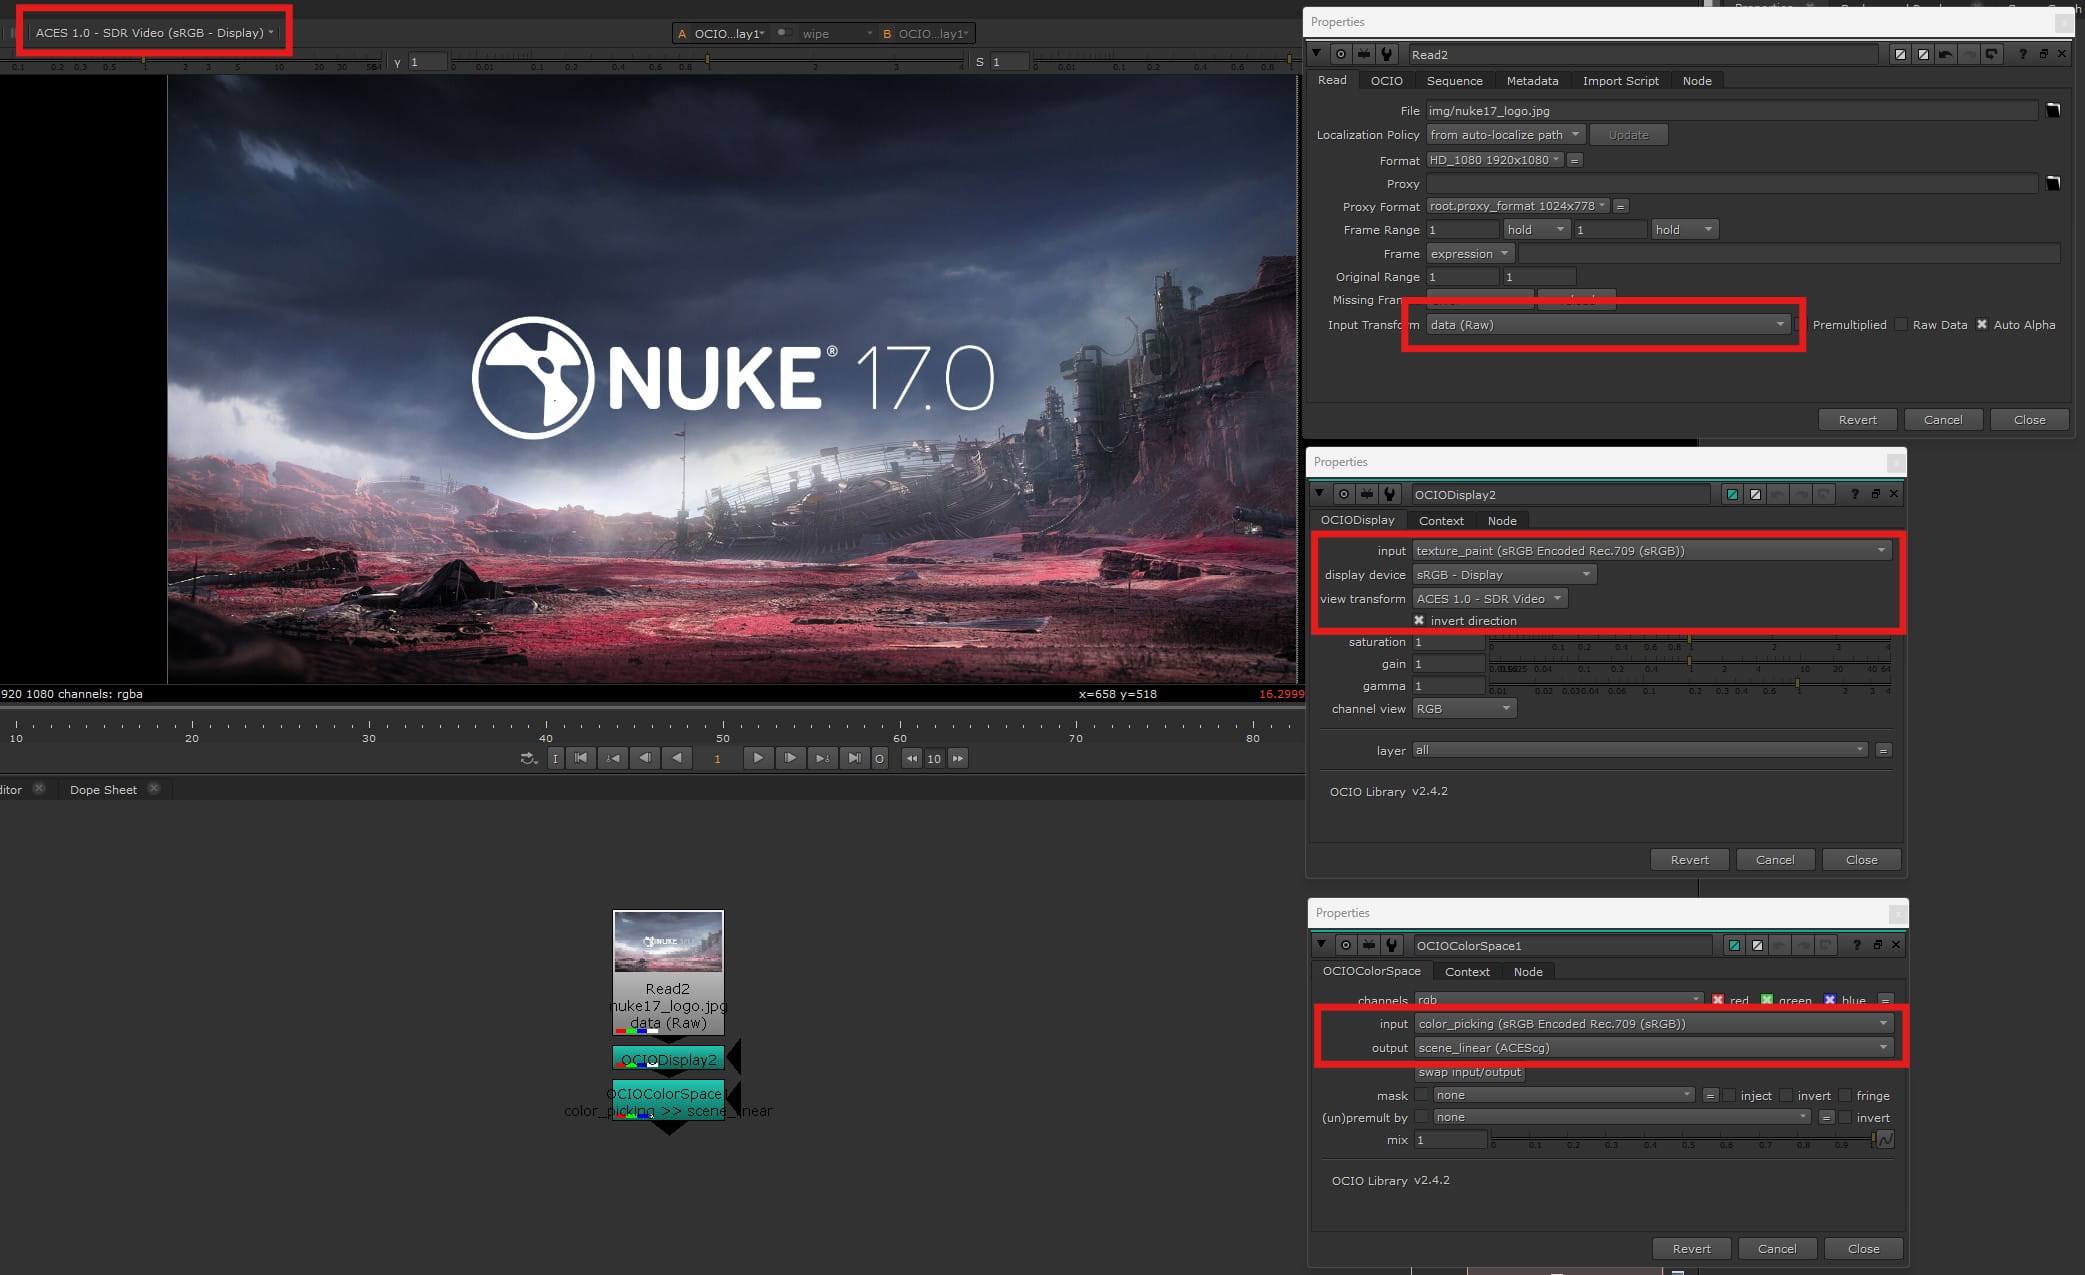
Method 2: Read as Raw, then OCIODisplay (inverted) + OCIOColorSpace to scene_linear. Same 16.3 white.
Be very clear about what these two methods give you. With both of them, the image in the viewer looks exactly like you see it in Windows Photos — same brightness, same contrast, no surprise. It feels like the "right" setting. But it is not the correct interpretation: the white is sitting at 16 in ACEScg, not at 1.0. Every bright pixel of your JPEG now carries the energy of a strong light source. You solved the look, but you broke the values.
If you want the image interpreted correctly — white at 1.0, controllable, physically meaningful values — you have to go the other way: the color_picking / texture_paint route, exactly like matte_paint (Utility - sRGB - Texture) in ACES 1.2. Yes, the image will look darker in the viewer, and yes, you will need a Grade to integrate it. That is the price of correct values — and it is the right price to pay.
This setup comes from the discussion on ACES Central about the confusion around ACES 1.3 in DCC software — worth reading: Some confusion about ACES 1.3 in DCC software.
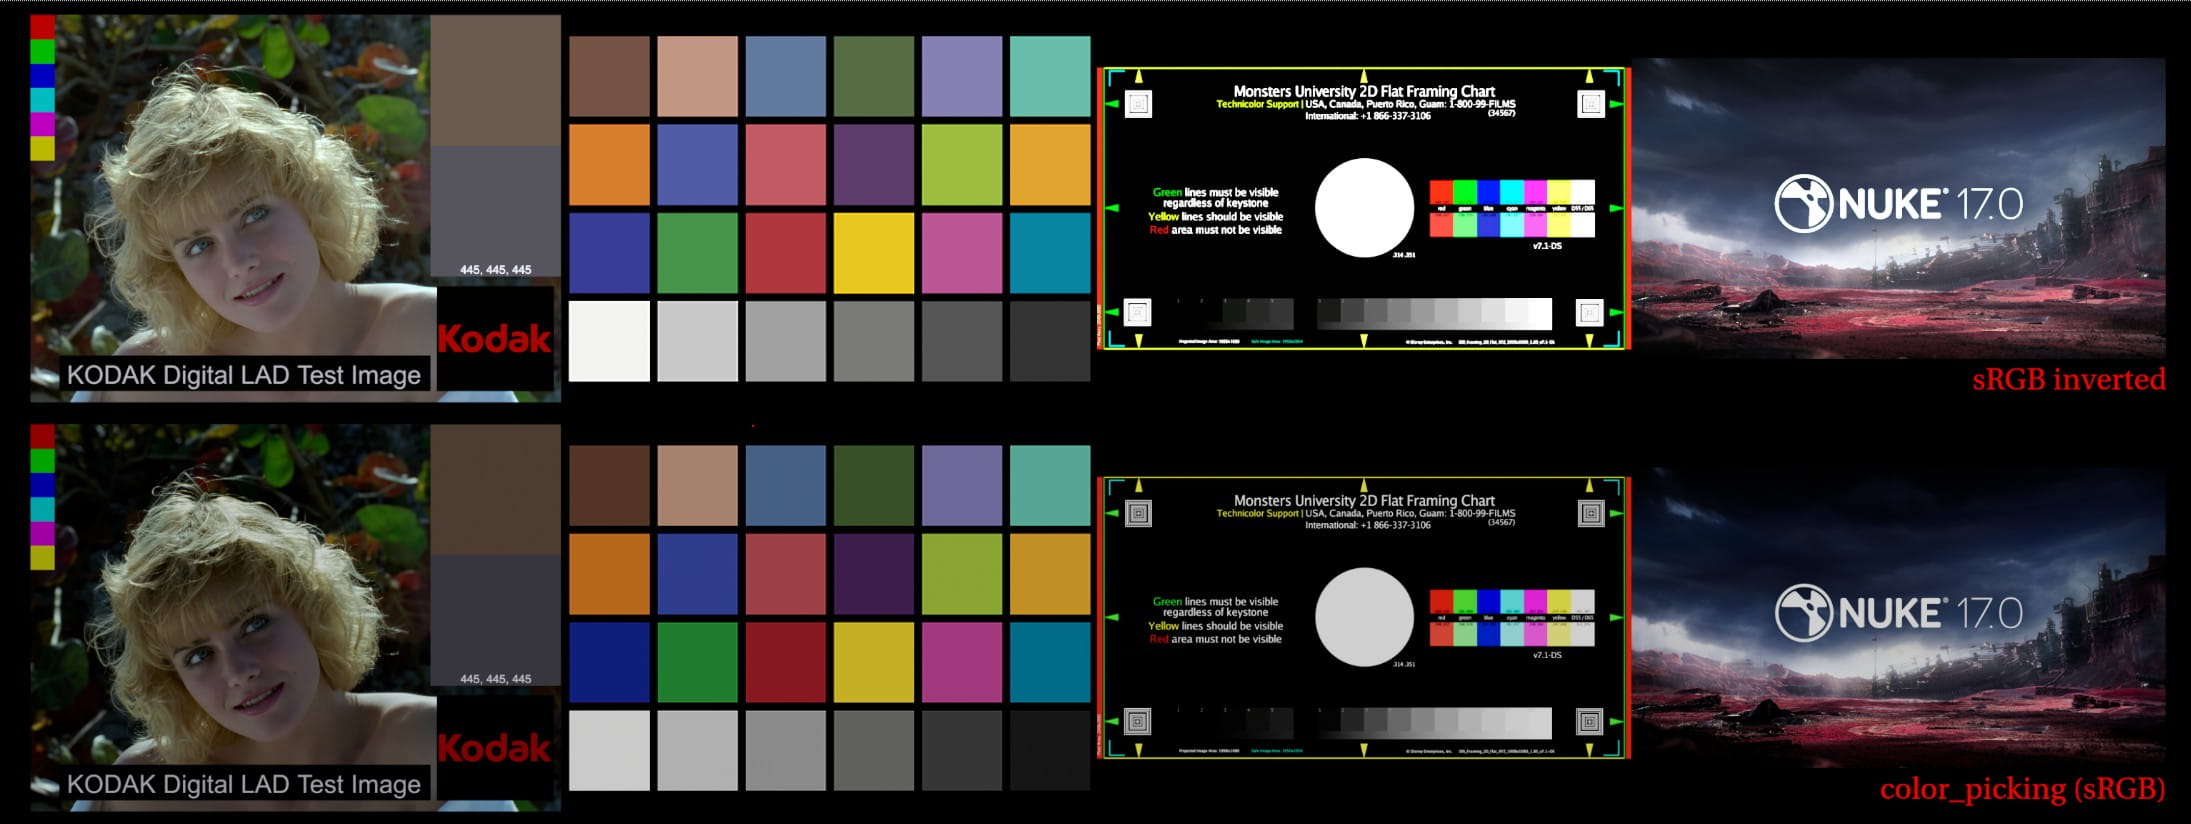
And here is the ACES 2.0 twist. The number ~16.3 belongs to the ACES 1.0 SDR Video view transform — which both the 1.2 and 1.3 configs use, since they share the identical display rendering transform. ACES 2.0 is where the rendering actually changes, and it changes deeply. Nuke 17 ships the 2.0 config as well: select it in the Project Settings and the whole display pipeline switches to the new transforms.
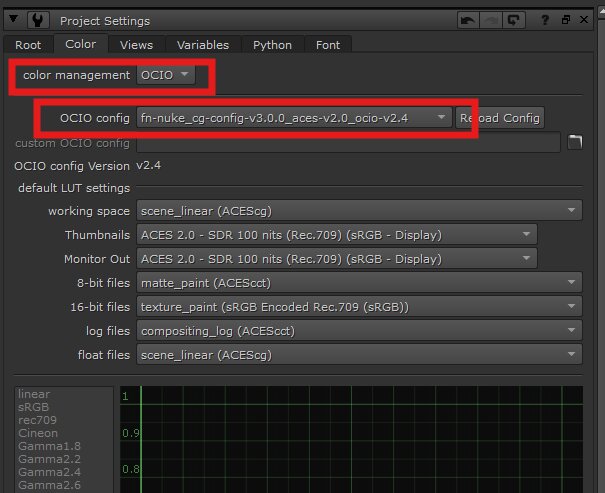
Nuke 17 Project Settings with the ACES 2.0 config (fn-nuke_cg-config-v3.0.0_aces-v2.0_ocio-v2.4). Note the new default roles and the ACES 2.0 SDR 100 nits view.
What changes from 1.3 to 2.0, in short:
A brand new tone scale. The RRT+ODT pair is replaced by a single, unified Output Transform built on a Michaelis-Menten type curve, parameterized on the peak luminance of the target display. Lower mid-tone contrast, much softer highlight rolloff, more detail preserved in the brights.
A new gamut mapping. Instead of hard-clipping saturated colors (the classic ACES 1.x artifacts on saturated reds, neons, LEDs), 2.0 compresses out-of-gamut colors gradually, working in the JMh space of the Hellwig 2022 color appearance model. This is a separate improvement from the tone scale — it affects which colors you can represent, not how bright values are mapped.
Consistent invertibility. Round-tripping (Output → Inverse → Output) is a design goal of 2.0, which matters exactly for the inverted route we are discussing here.
And the consequence for our white value test: repeat the same inverted OCIODisplay setup, but with the ACES 2.0 - SDR 100 nits (Rec.709) view transform. The white of the chart does not sample at 16.3 anymore — it samples at 127.99957 ≈ 128:
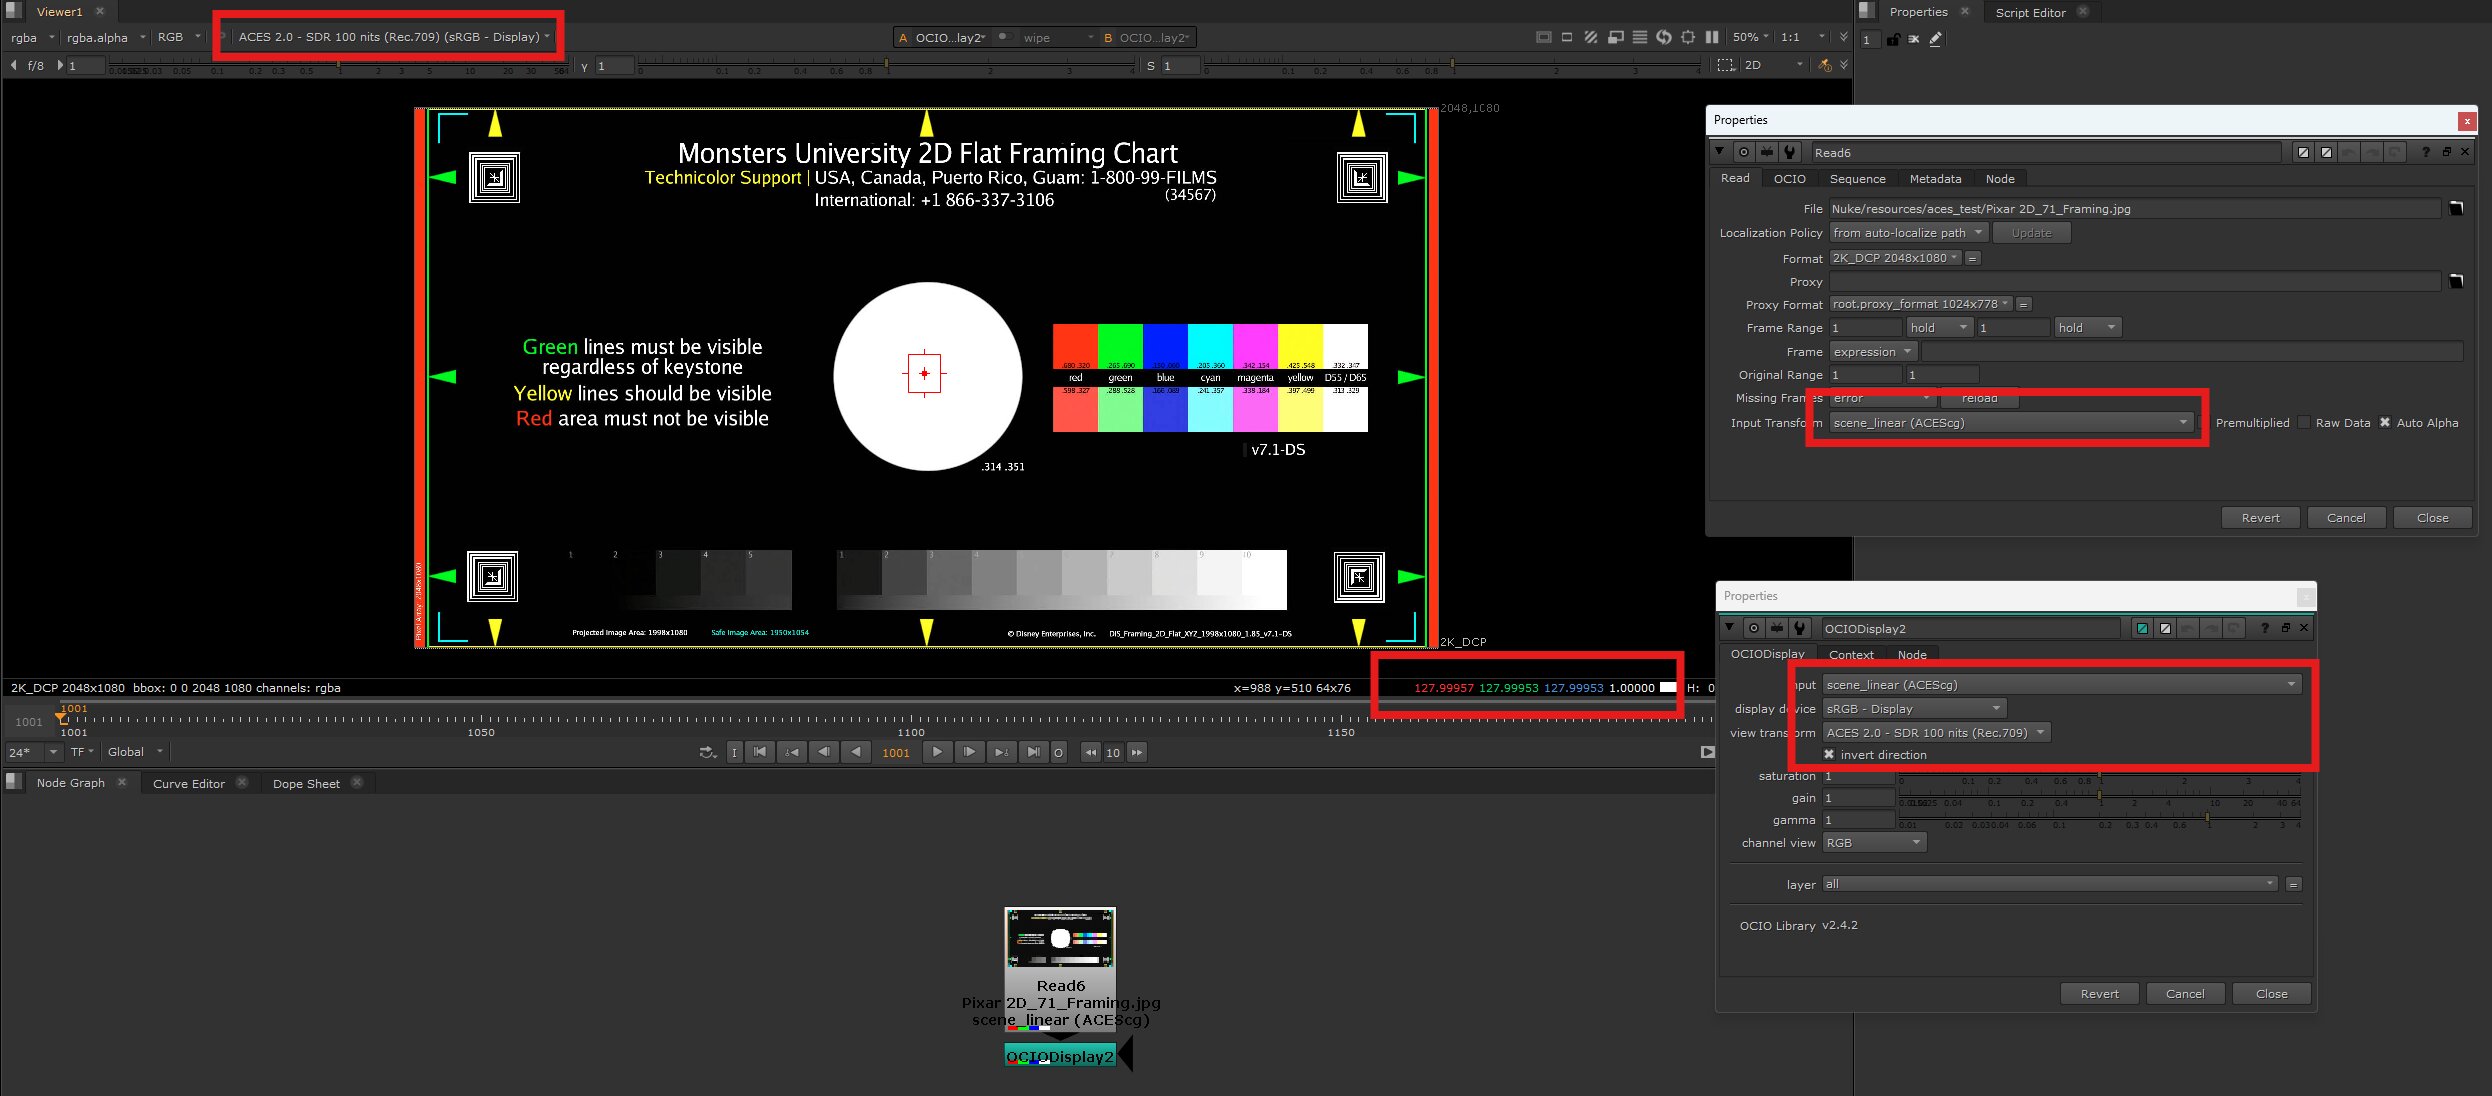
Same inversion test, ACES 2.0 SDR 100 nits view: white lands at ~128 in ACEScg. About 3 stops higher than the 16.3 of ACES 1.x.
This is the new tone scale at work: the 2.0 curve spreads the highlights over roughly 3 extra stops before saturating to display white (see section 06). It also means the saturation point is no longer one fixed number — it moves with the peak luminance of the target display. So if you sample a white pixel and get a number different from what you expected, check which view transform your OCIODisplay is inverting before thinking something is broken. And note that with 2.0 the inverted route produces values even more extreme than before (128 instead of 16) — which makes the texture/color_picking route even more clearly the correct interpretation.
The practical recommendation does not change: in Nuke 17, exactly like in Nuke 16, the professional default for 8-bit images is the automatic role (color_picking) plus a manual Grade/Exposure to integrate the element in the scene. The inverted OCIODisplay route remains a special tool for emissive content, whatever the version.
10. Going deeper: light, photography & imaging
A quick note on scope. This article is deliberately focused on the practical problem of interpreting an 8-bit image once it is already inside an ACES workflow. It is not a treatise on the physics of image formation — that would be a different (and much longer) article.
But that physics is the foundation underneath everything here. The reason ACEScg is scene-referred at all is that it models real light: photons emitted, bouncing off surfaces, travelling through the lens and hitting the sensor — with no 1.0 ceiling, because real light has none. Understanding why the input and output work the way they do makes the whole "white at 16" logic click into place. So if you want to explore the concepts behind this article, here are some good starting points:
Exposure Value (EV) — how shutter speed and f-number combine into a single exposure measure, and why "stops" are the natural language of light.
Inverse-square law — why light intensity falls off with the square of the distance from the source.
Middle grey (18%) — the photographic anchor that ACES maps to 0.18 in scene-linear.
Image sensor & camera imaging — how photons become digital numbers, the analog-to-digital chain behind every plate.
Scene-referred vs display-referred — the core distinction that this whole article is built on.
Dynamic range — why a scene can hold detail from deep shadow to bright sun, and why 8 bits can't.
None of these are required to use the workflow in this article — but if you understand them, you'll never be confused by a colorspace dropdown again.
11. Useful links
ACES Central - Output sRGB or Utility sRGB Texture?
ACES Central - Proper workflow for 8 and 16 bit images
ACES Central - Utility sRGB Texture too dark
ACES Central - Nuke: sRGB → ACES → sRGB = Not the same
ACES Central - sRGB textures to ACEScg
ACES Central - ACEScg and sRGB questions (texture/asset creation)
ACES Central - Some confusion about ACES 1.3 in DCC software
ACES Central - Path ACEScg to regular sRGB
Foundry Community - 8 bit sRGB assets and clamping in ACEScg
Compositing Academy - ACES Tone Mapping in Nuke
Chris Brejon - OCIO, Display Transforms and Misconceptions
Ezequiel Mastrasso - Nuke ACES sRGB D60 sim ODT
Maxon - Compositing with ACES (Redshift docs)
Leonel Nguyen - ACES Documentation
acescolorspace.com
ACES 2.0 specific:
ACES Docs - About ACES 2 (official: what's new in ACES 2)
ACES Docs - About the Rendering Transform (official design goals)
ACES Docs - Tone Mapping technical details (the new tone scale, with the official values table)
ACES Central - ACES 2.0 features and development announcement
Mixing Light - ACES 2.0 volumetric gamut mapping in action
GitHub - ACES official repository (aces-aswf, reference implementation)
Photography & imaging fundamentals:
Exposure Value (EV)
Inverse-square law
Middle grey (18%)
Image sensor & camera imaging
Scene-referred vs display-referred
Dynamic range
General color management resources:
OpenColorIO (official site)
OpenColorIO documentation
ACES Central (official ACES community & docs hub)
ACES official documentation
Academy Software Foundation (ASWF)
Chris Brejon - CG Cinematography (free online book, chapter 1.5 covers ACES in depth)
Cinematic Color (VES white paper on color pipelines, free)
Colour Science (open-source colour science library & articles)
Charles Poynton - color & video engineering articles
toodee.de - Using ACES series (incl. the sRGB-Texture IDT article)
Toadstorm - An Idiot's Guide to ACES
Books:
Color Management Handbook for Visual Effects Artists (Victor Perez)
Color Science and Digital Imaging (Steve Wright)
Cinematic Color: From Your Monitor to the Big Screen (Jeremy Selan / VES) — free PDF
Digital Video and HD: Algorithms and Interfaces (Charles Poynton) — the classic reference on video color encoding
Color Correction Handbook (Alexis Van Hurkman) — grading-oriented but excellent on color fundamentals
The Art and Science of Digital Compositing (Ron Brinkmann) — the compositing bible, with solid chapters on color
Online tutorials & courses:
Foundry - Color Management Fundamentals & ACES Workflows in Nuke (official course)
Cullen Kelly - YouTube channel (color science & grading, excellent on display transforms)
Compositing Academy - ACES articles & courses
Mixing Light - color grading tutorials & ACES content